

MonashPharmacy
Lab safety
induction
House rules, emergency response and chemical handling for everyone working in the School of Pharmacy laboratories.
What we're actually handling
Two families of hazard, and they do not share the same controls.
Biological/clinical hazards
Pathogens, viruses, toxins, spores and fungi, organic material that threatens health through infection or toxicity. It transmits, and it multiplies.
Chemical hazards
Substances that harm on exposure: skin irritants, carcinogens, respiratory sensitisers. Plus those whose physical properties are the hazard, flammable, corrosive, oxidising.
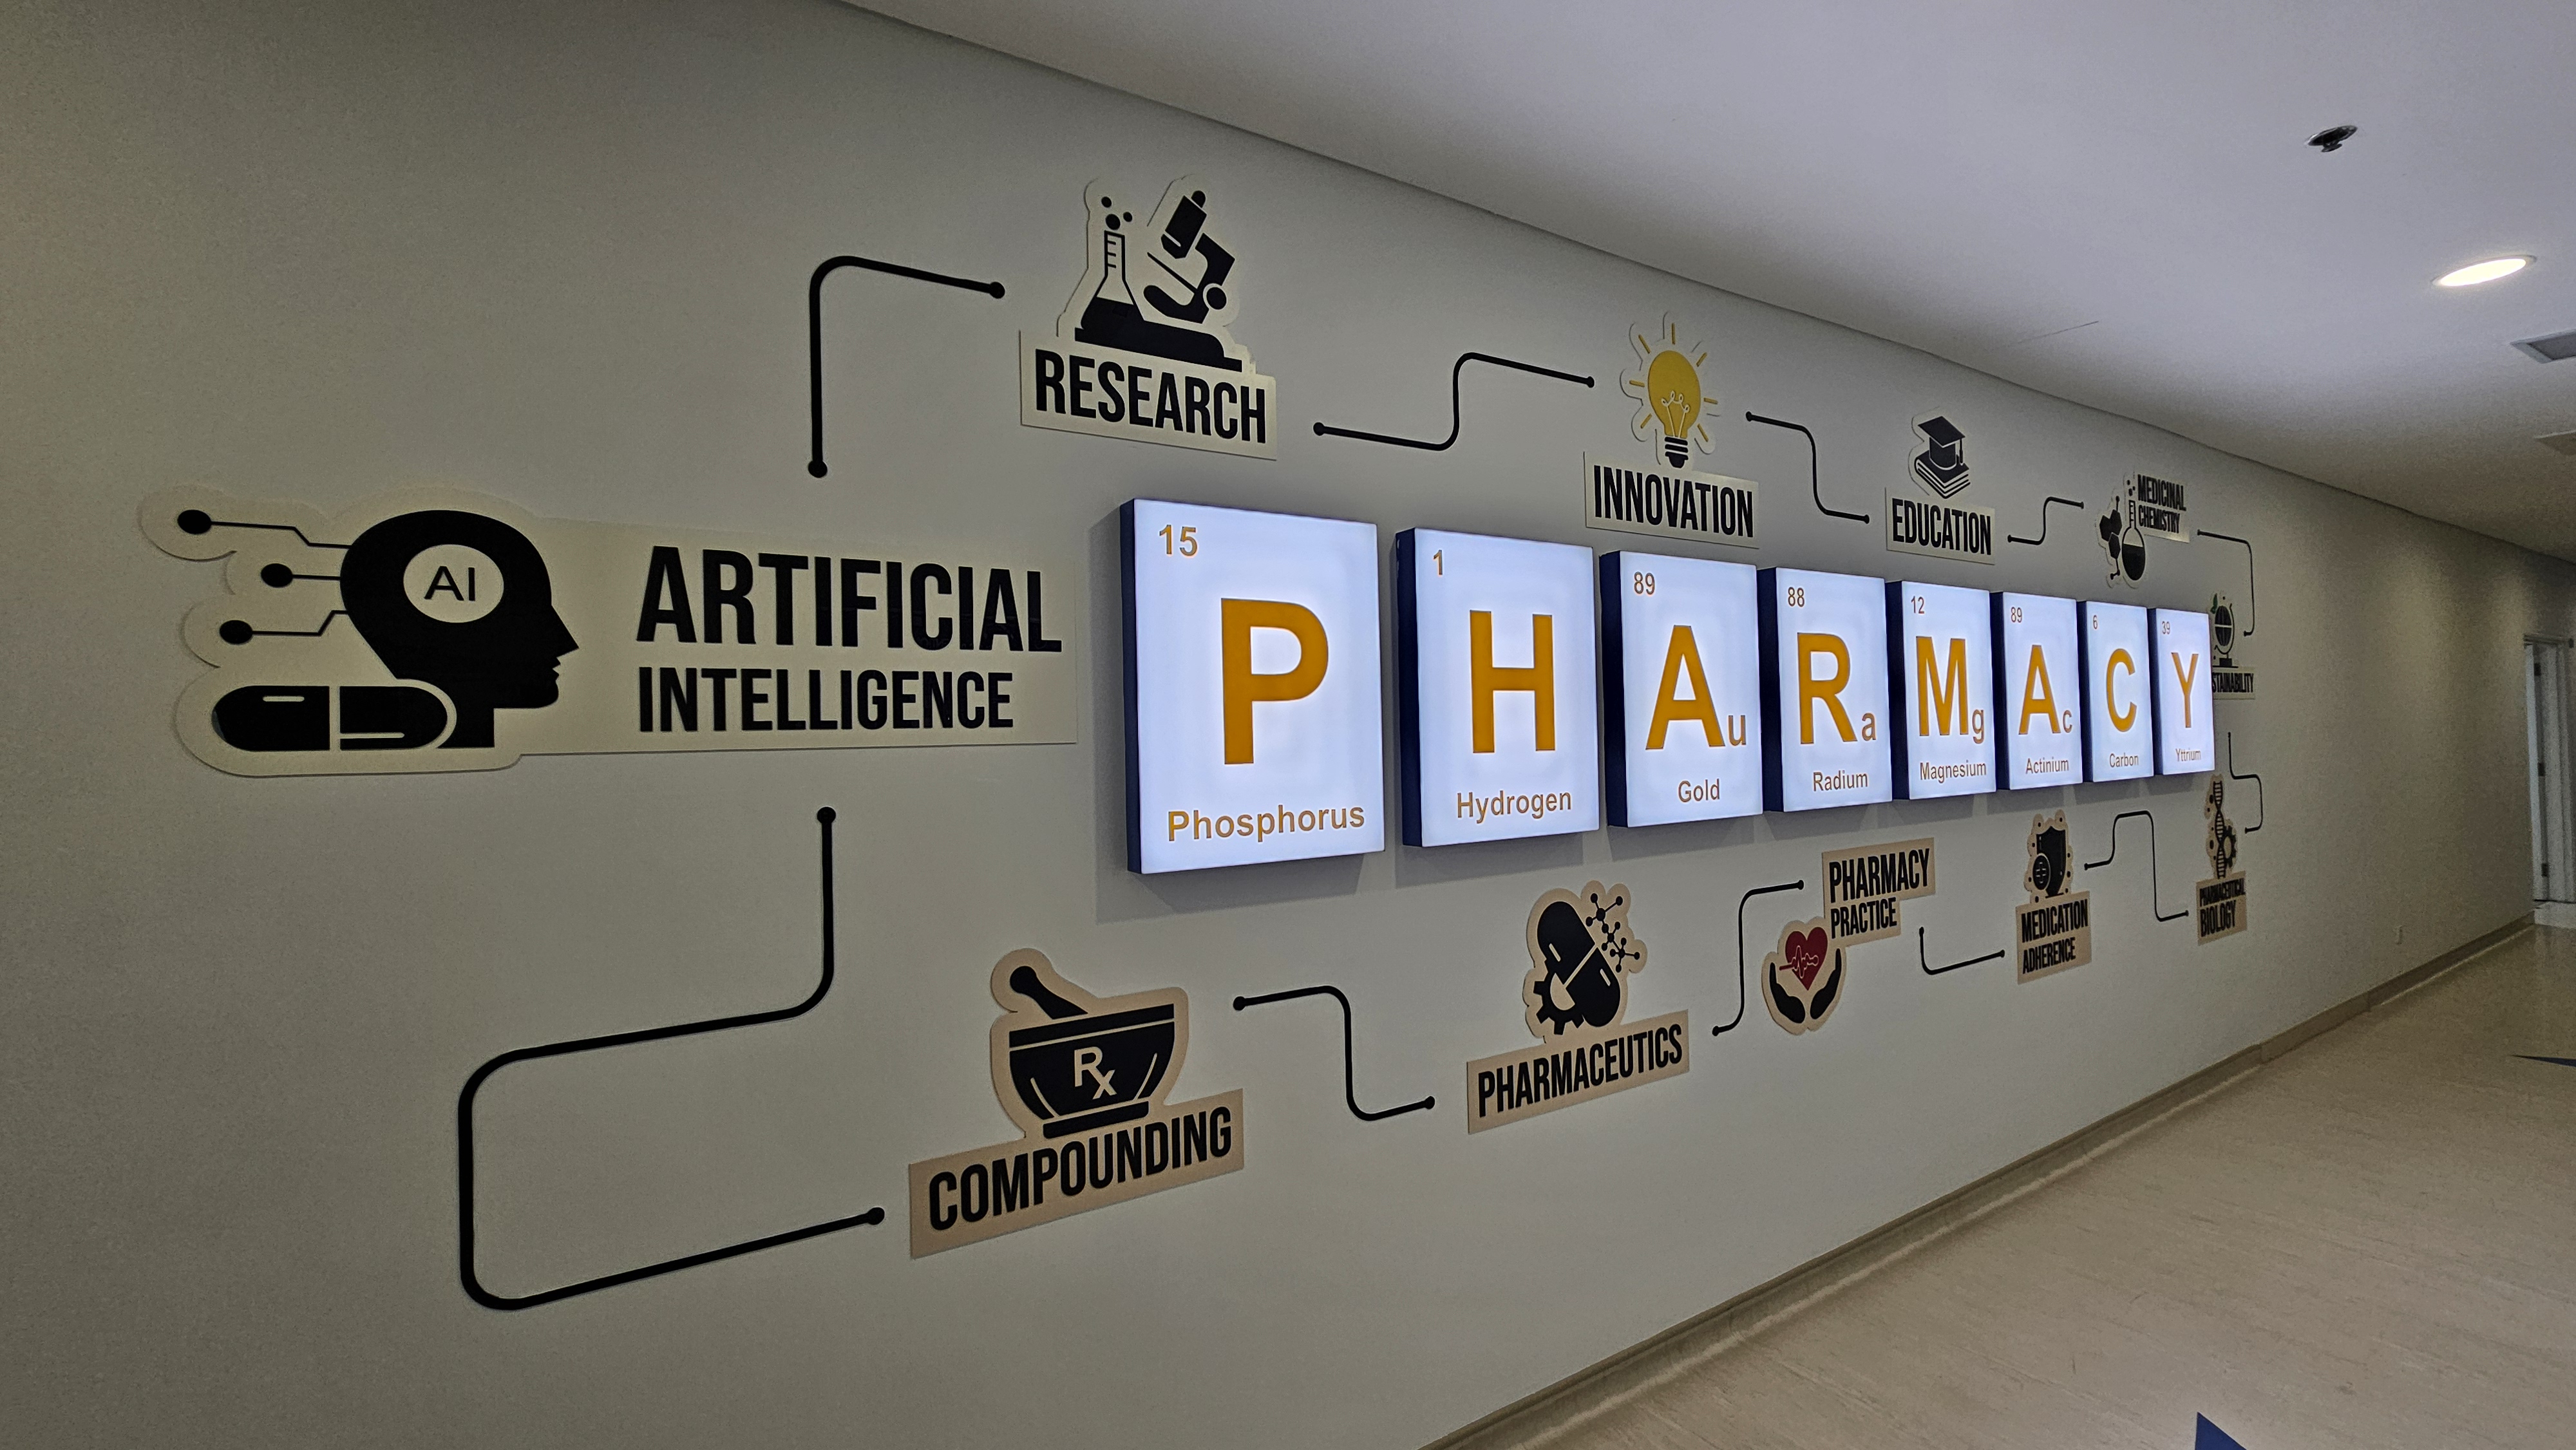
Every discipline on that wall works with one or both of these hazard families
Different families, same mechanism: neither one harms you until it reaches you.
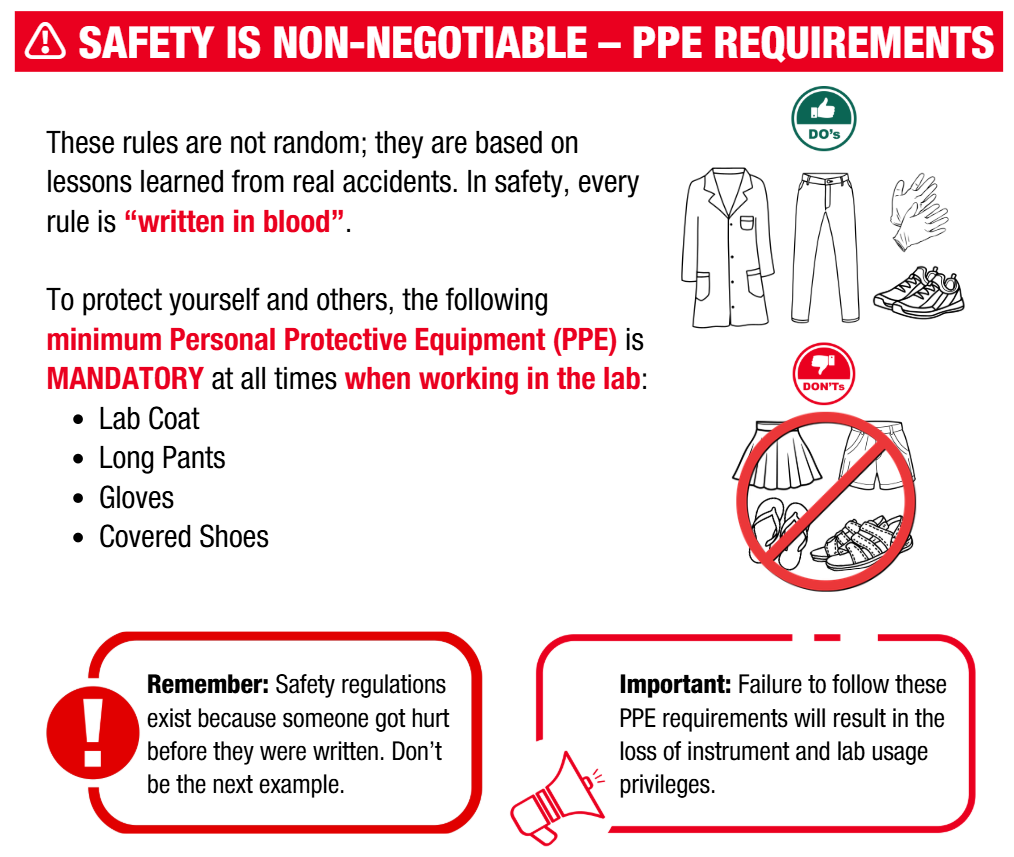
Non-negotiable
Every rule here exists because someone was hurt before it was written. Failing them costs you instrument and lab access.
Your route out
Red is the main route, orange the alternative. Both end at the campus field. Take red by default: the orange route runs through the cafeteria, where the foot traffic slows everyone down.
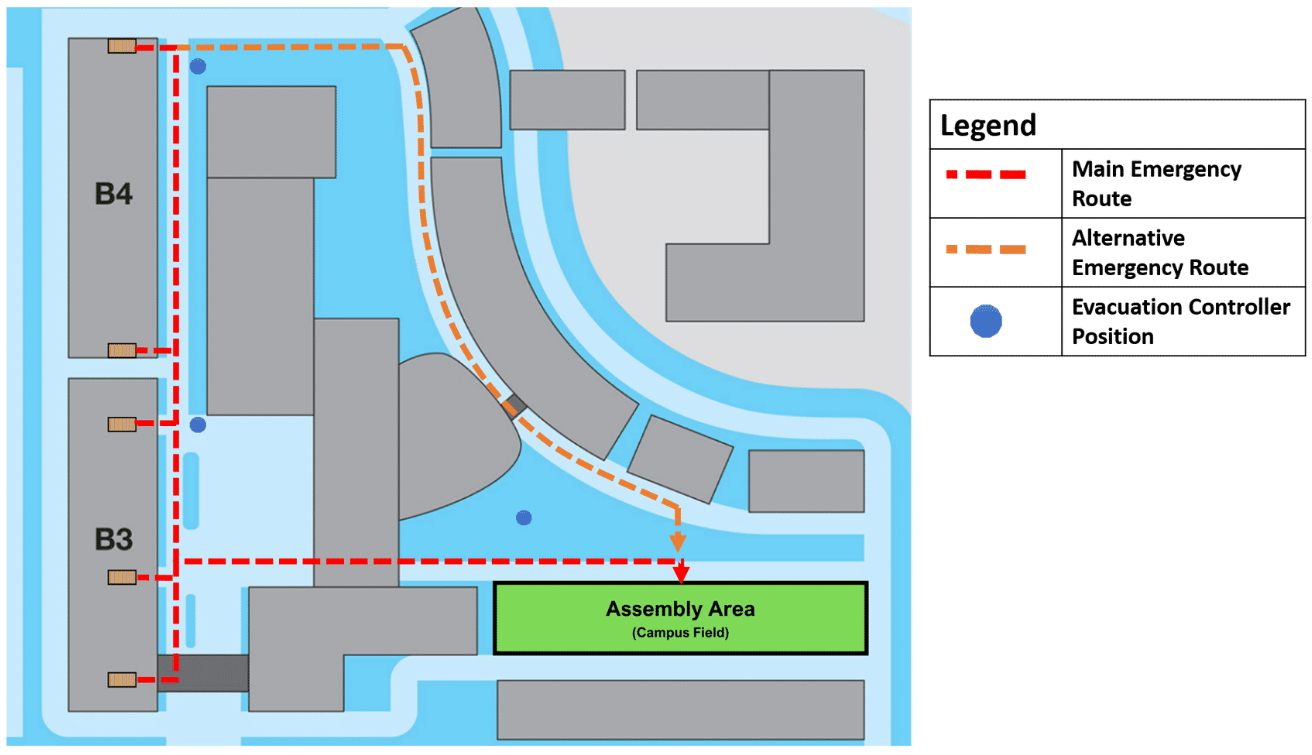
Trace the red route before an alarm makes you learn it. Orange only if red is blocked
Assembly area
The campus field, marked by the green emergency assembly point sign. Stay there until the warden clears you.
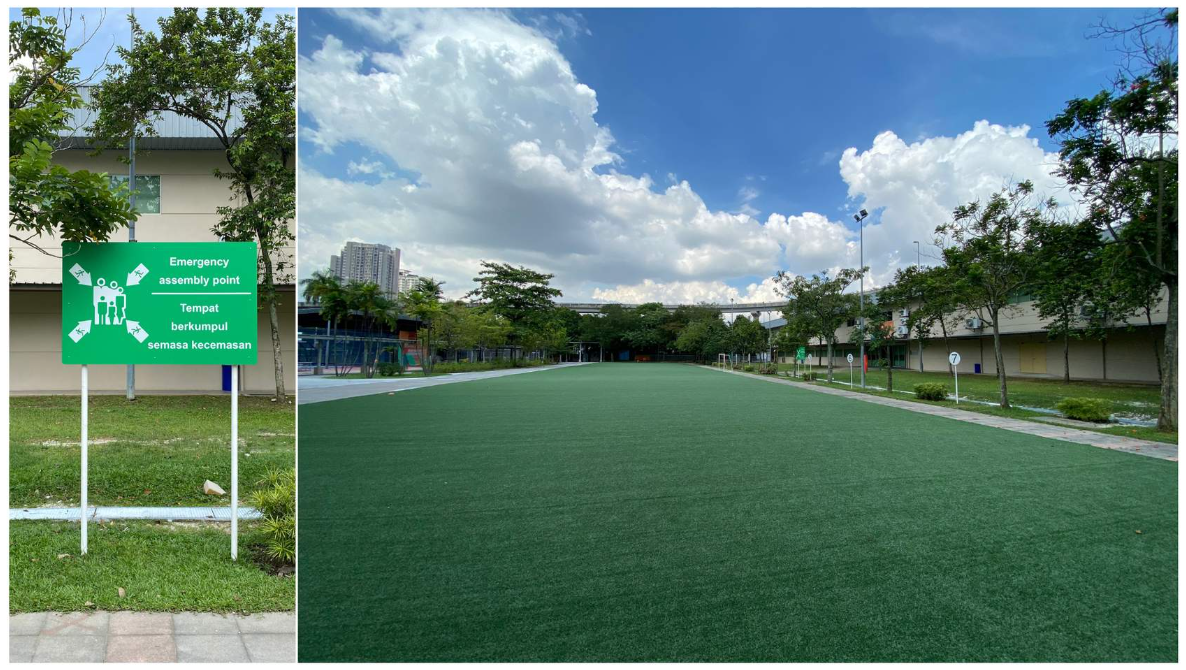
Look for the sign, then wait on the field, not on the path
Emergency equipment
Find each of these in your own lab this week, plus your safety cabinets, fume hood and biosafety cabinet. Never block access to any of it, not with a trolley, a box or a chair.
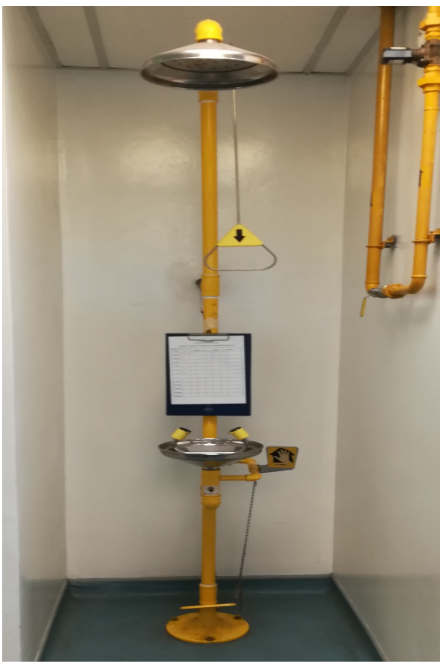
Safety shower and eye wash
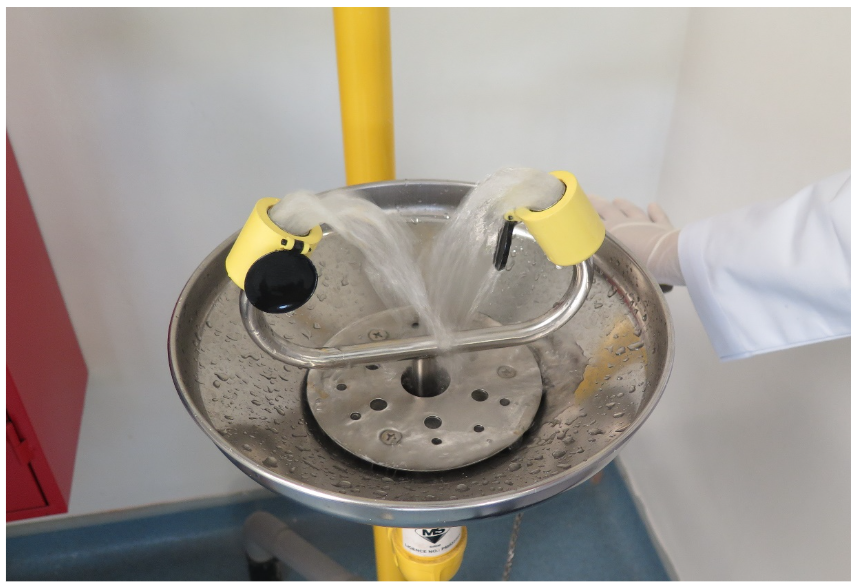
Eye wash running, fifteen minutes, both eyes
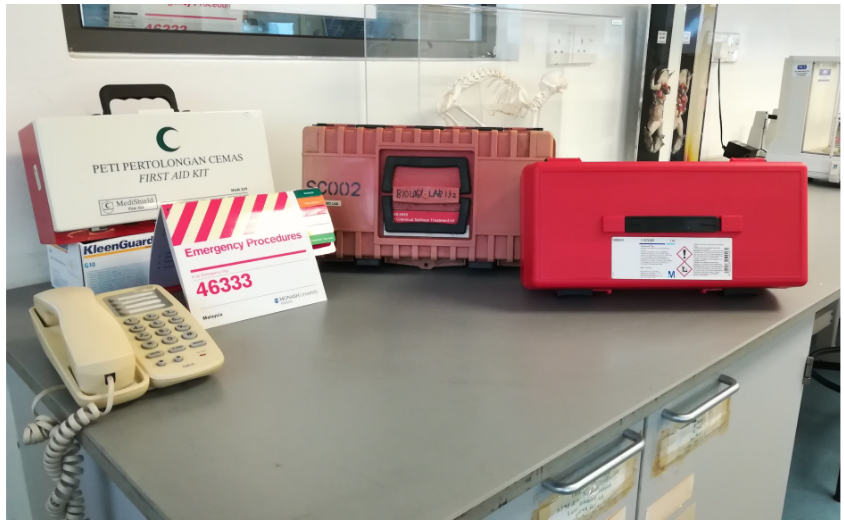
First aid kit, lab phone and spill kits
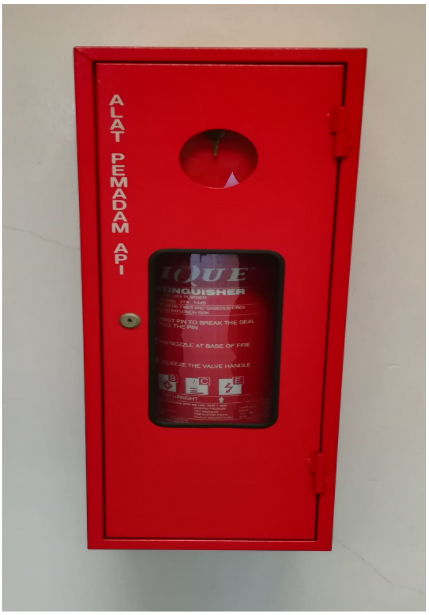
Fire extinguisher, and the break-glass alarm beside it
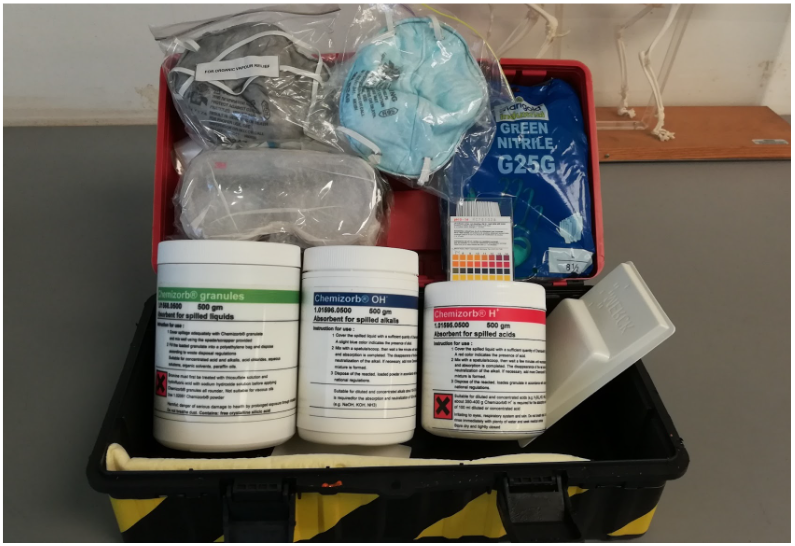
Inside a chemical spill kit
Reporting a hazard or incident
A near miss is an injury that hasn't happened yet.
- 1Tell the Technical Officer or your supervisor straight away.
- 2Lodge it with OHSE through the Hazard & Incident Reporting form on S.A.R.A.H.+
What S.A.R.A.H.+ is
The Safety and Risk Analysis Hub. Monash's online reporting tool for staff and students to log OHS near misses, hazards and incidents.
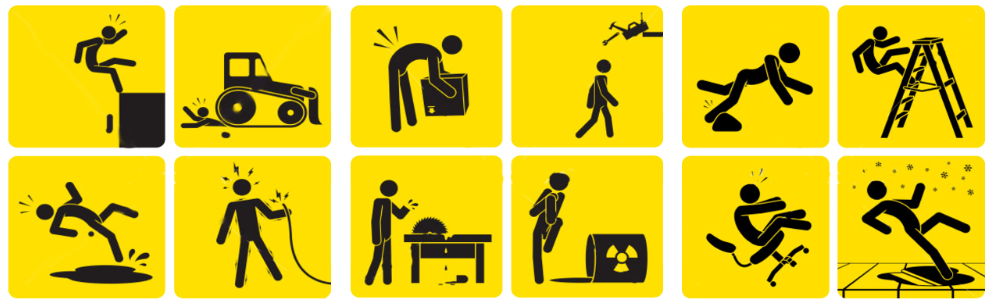
Every one of these was a near miss first
The lion in the room
The same five controls, applied to one hazard. Which one would you trust?
Name your five, then click
Click to reveal
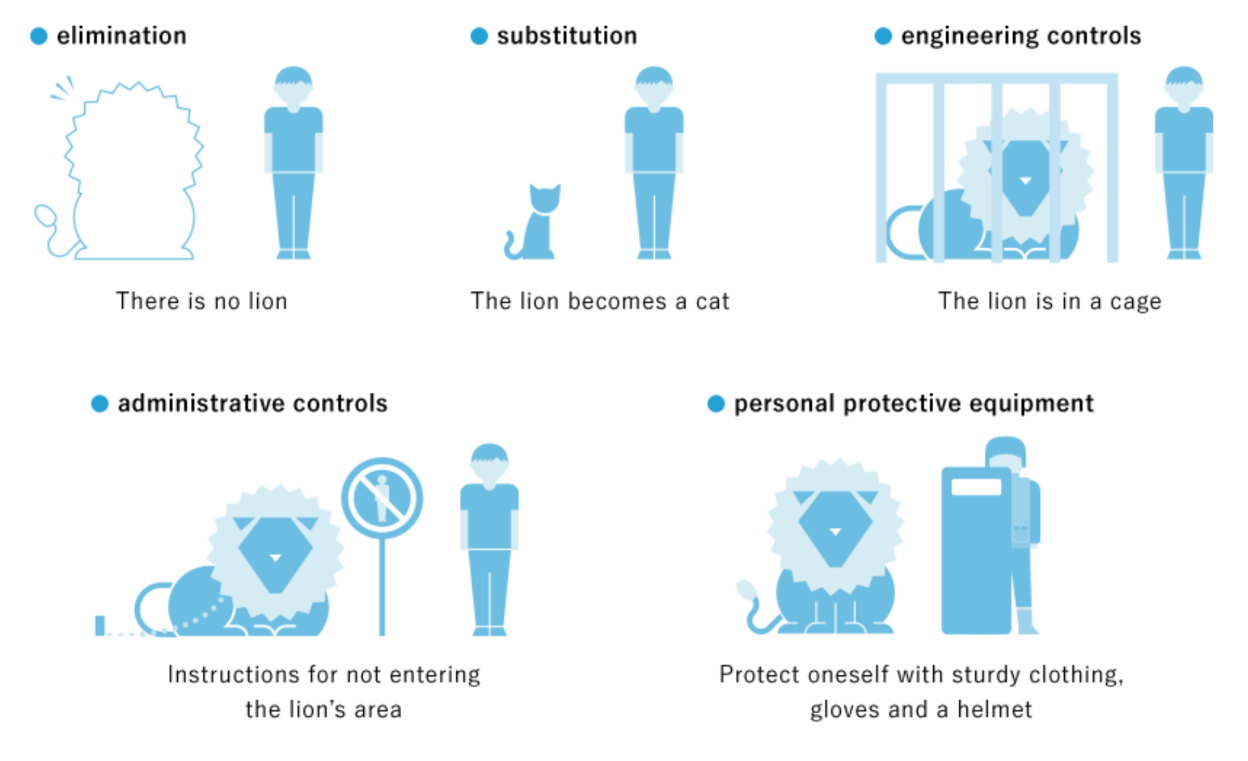
PPE is the only one where the lion is still loose
Labelling a decanted chemical
Anything transferred out of its original container needs the Monash decanted label, including the beaker you'll finish with in ten minutes. Which of the two you take depends on the container size.
List the fields, then click to check
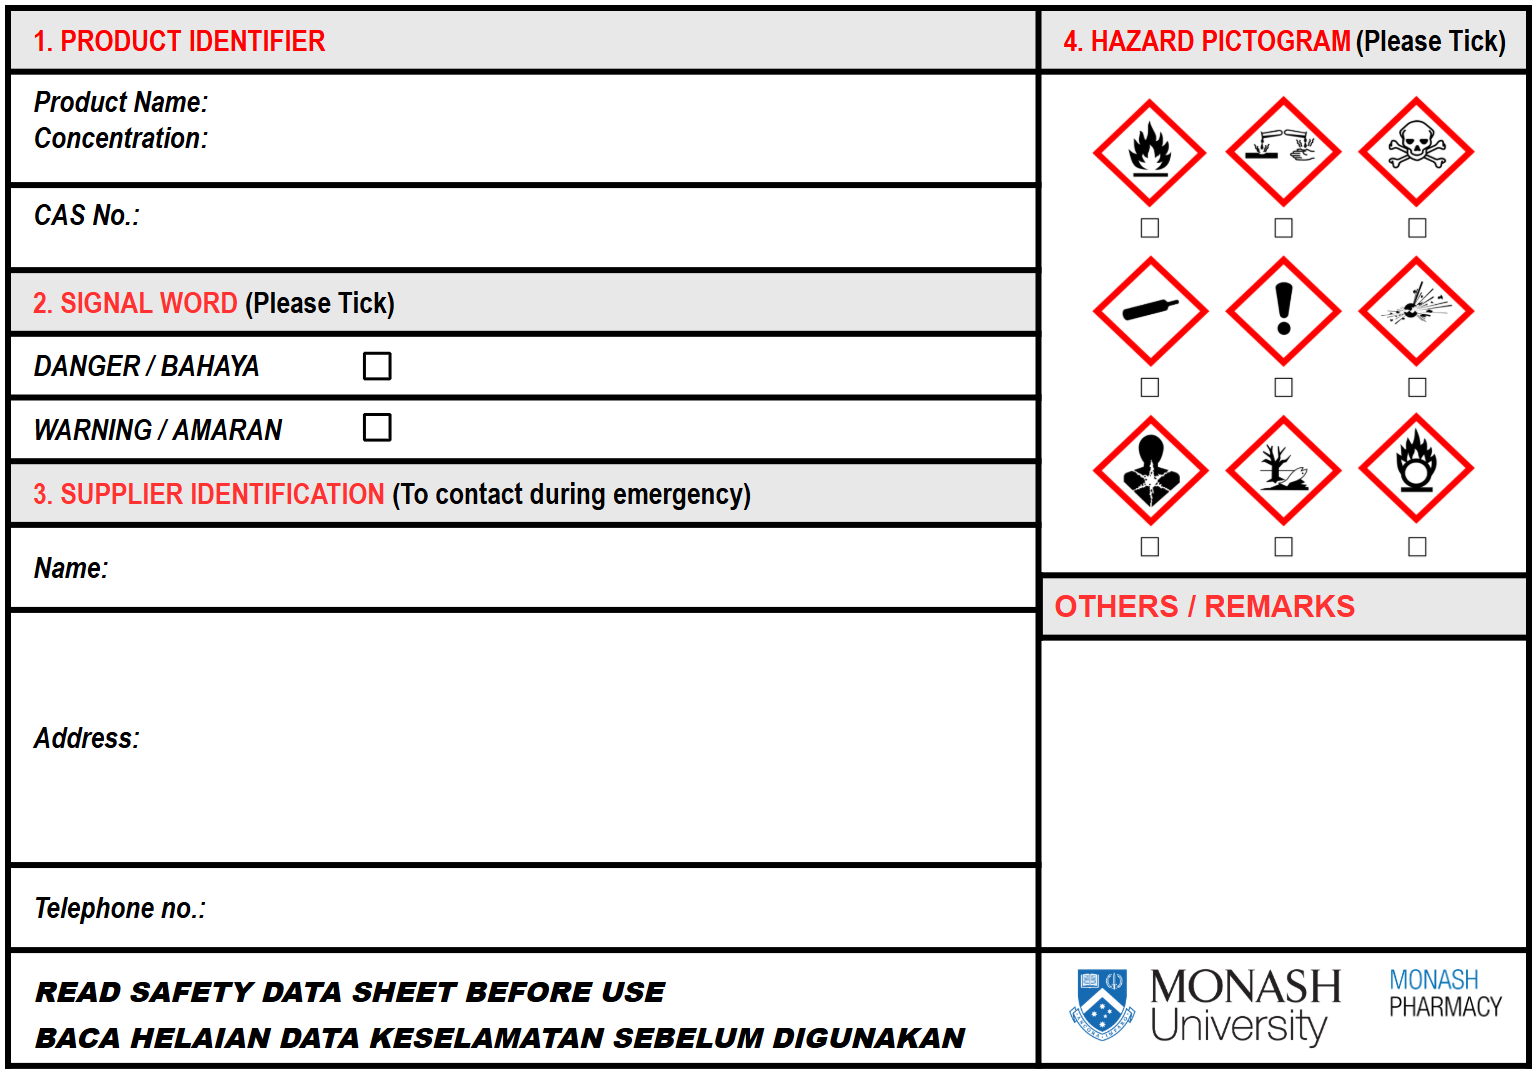
125 mL or less: four sections
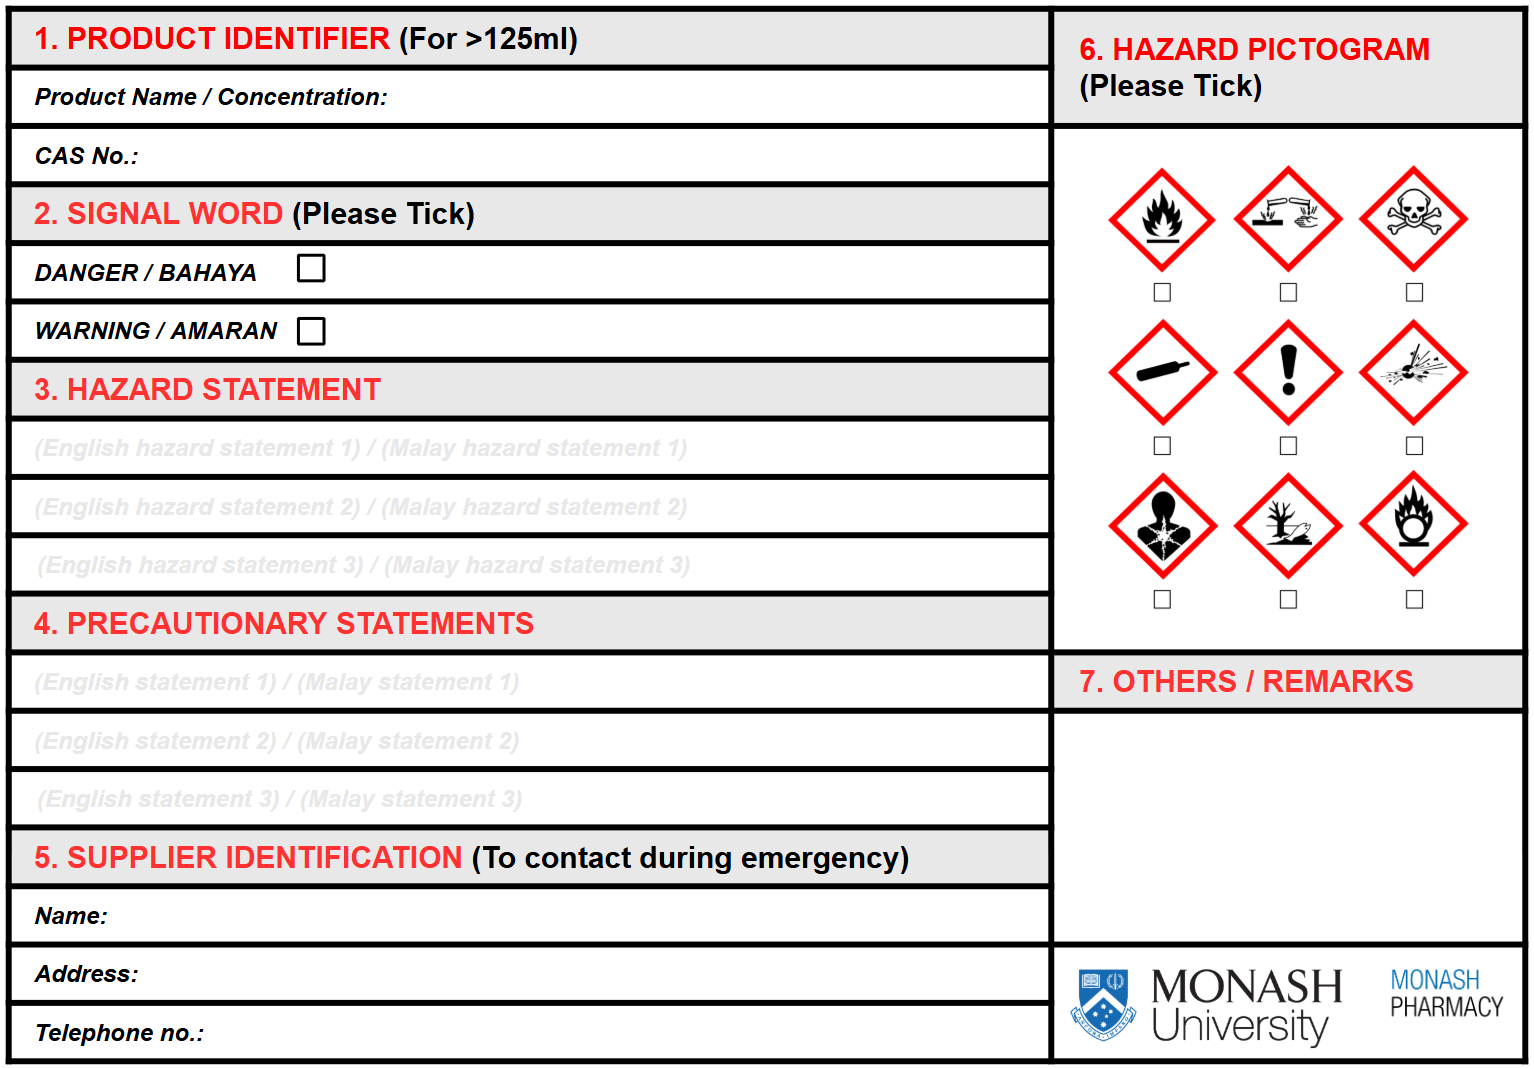
Over 125 mL: adds hazard and precautionary statements
Click to reveal what goes on it
- Product name, concentration and CAS number, copied off the SDS
- Signal word ticked, and every pictogram the SDS shows
- Supplier name, address and phone from the bottle or SDS section 1
- Over 125 mL: hazard and precautionary statements, English and Malay
- Anything else worth knowing goes in Others / Remarks
- Printed copies in the LMO, 3-6-05; soft copy on the LMO site
Filling in the label
Three fields, every time: waste name, generator and school, and the stream circled. Match the pictogram to the OHSE segregation sheet posted with the labels.
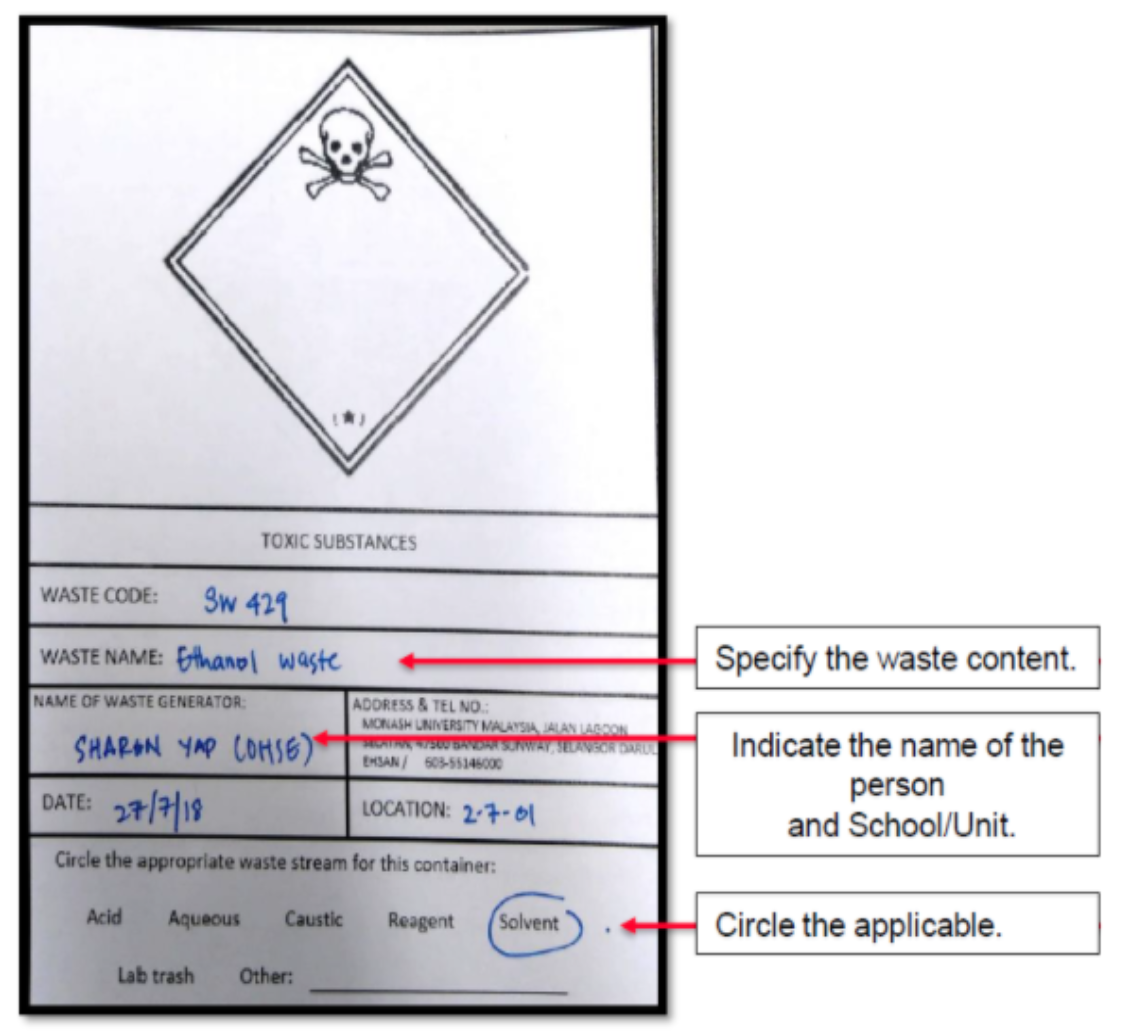
A half-labelled container does not get collected
Clinical waste: 3-6-17A
Yellow SW 404 bin inside the door, with the flowchart and the scheduled waste QR poster on the wall above it. Same set at 4-6-15.
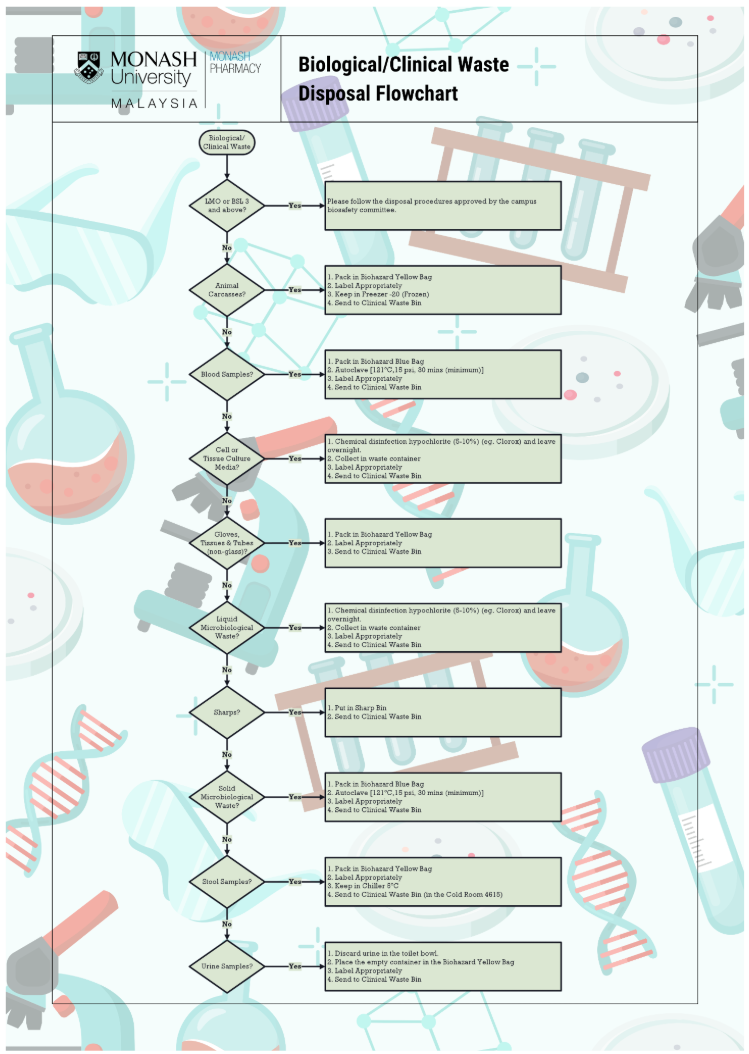
Biological/clinical waste flowchart
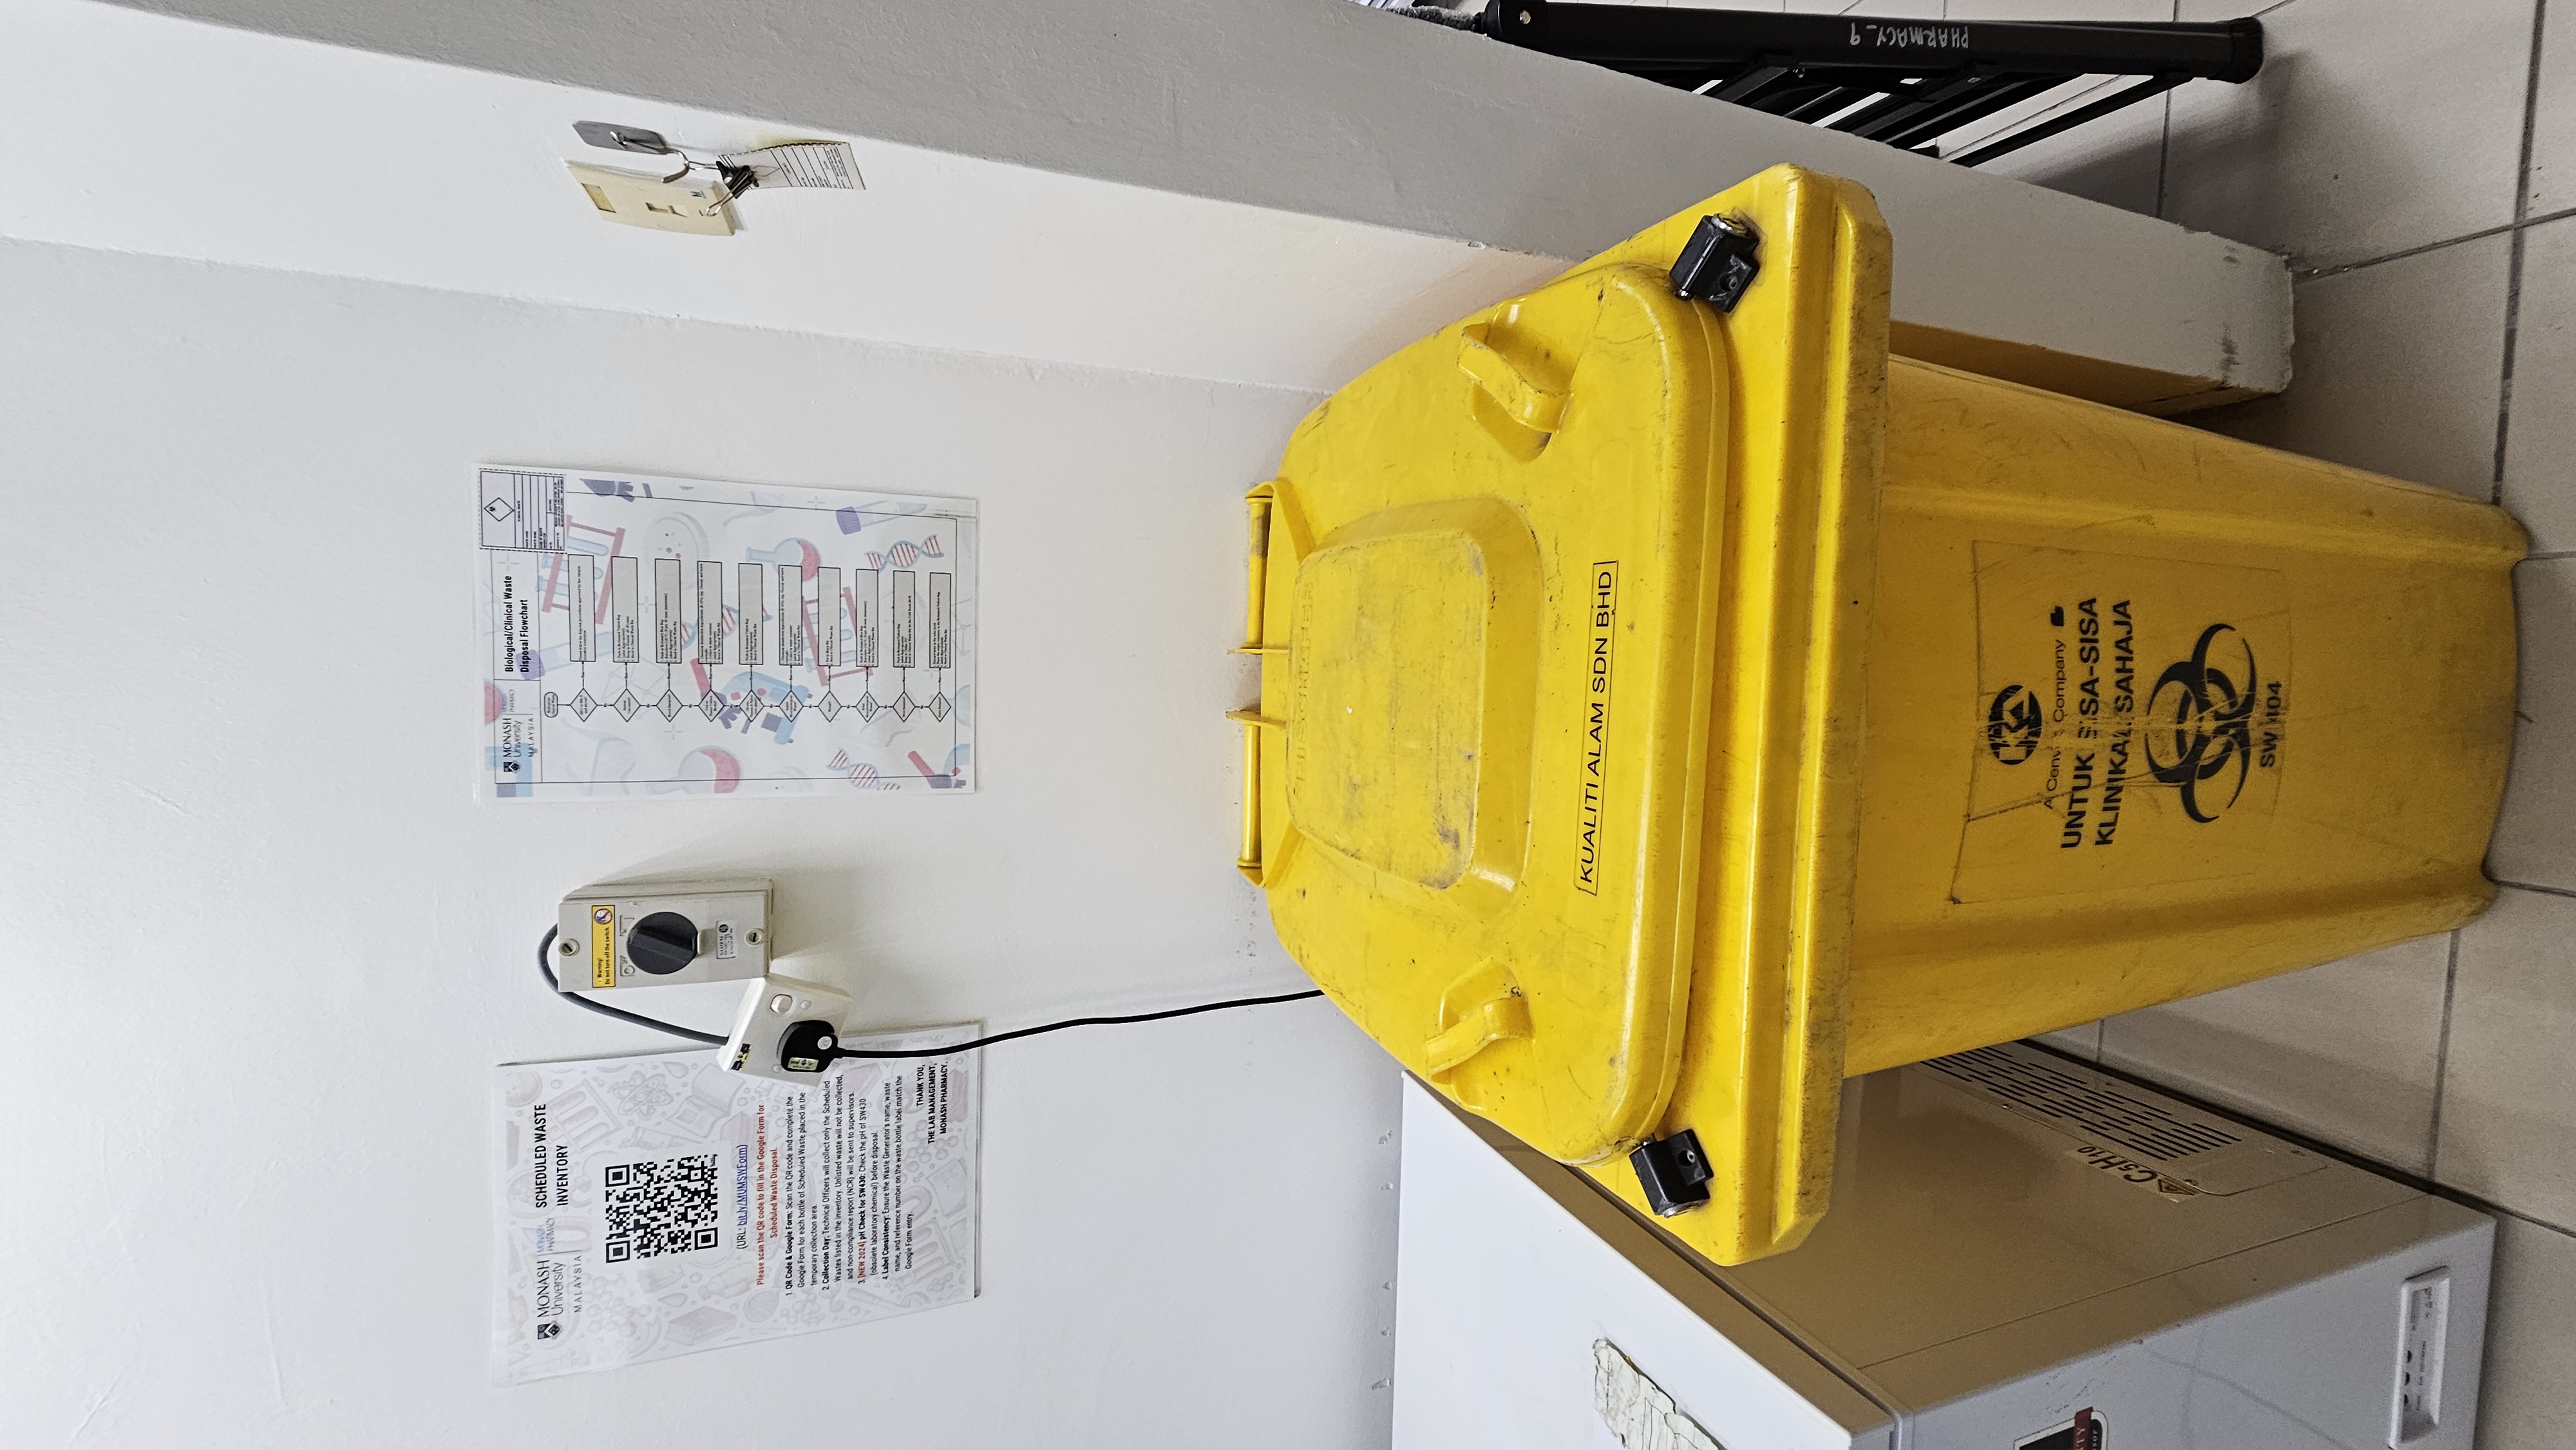
Above the yellow bin at 3-6-17A, scan the QR to log waste
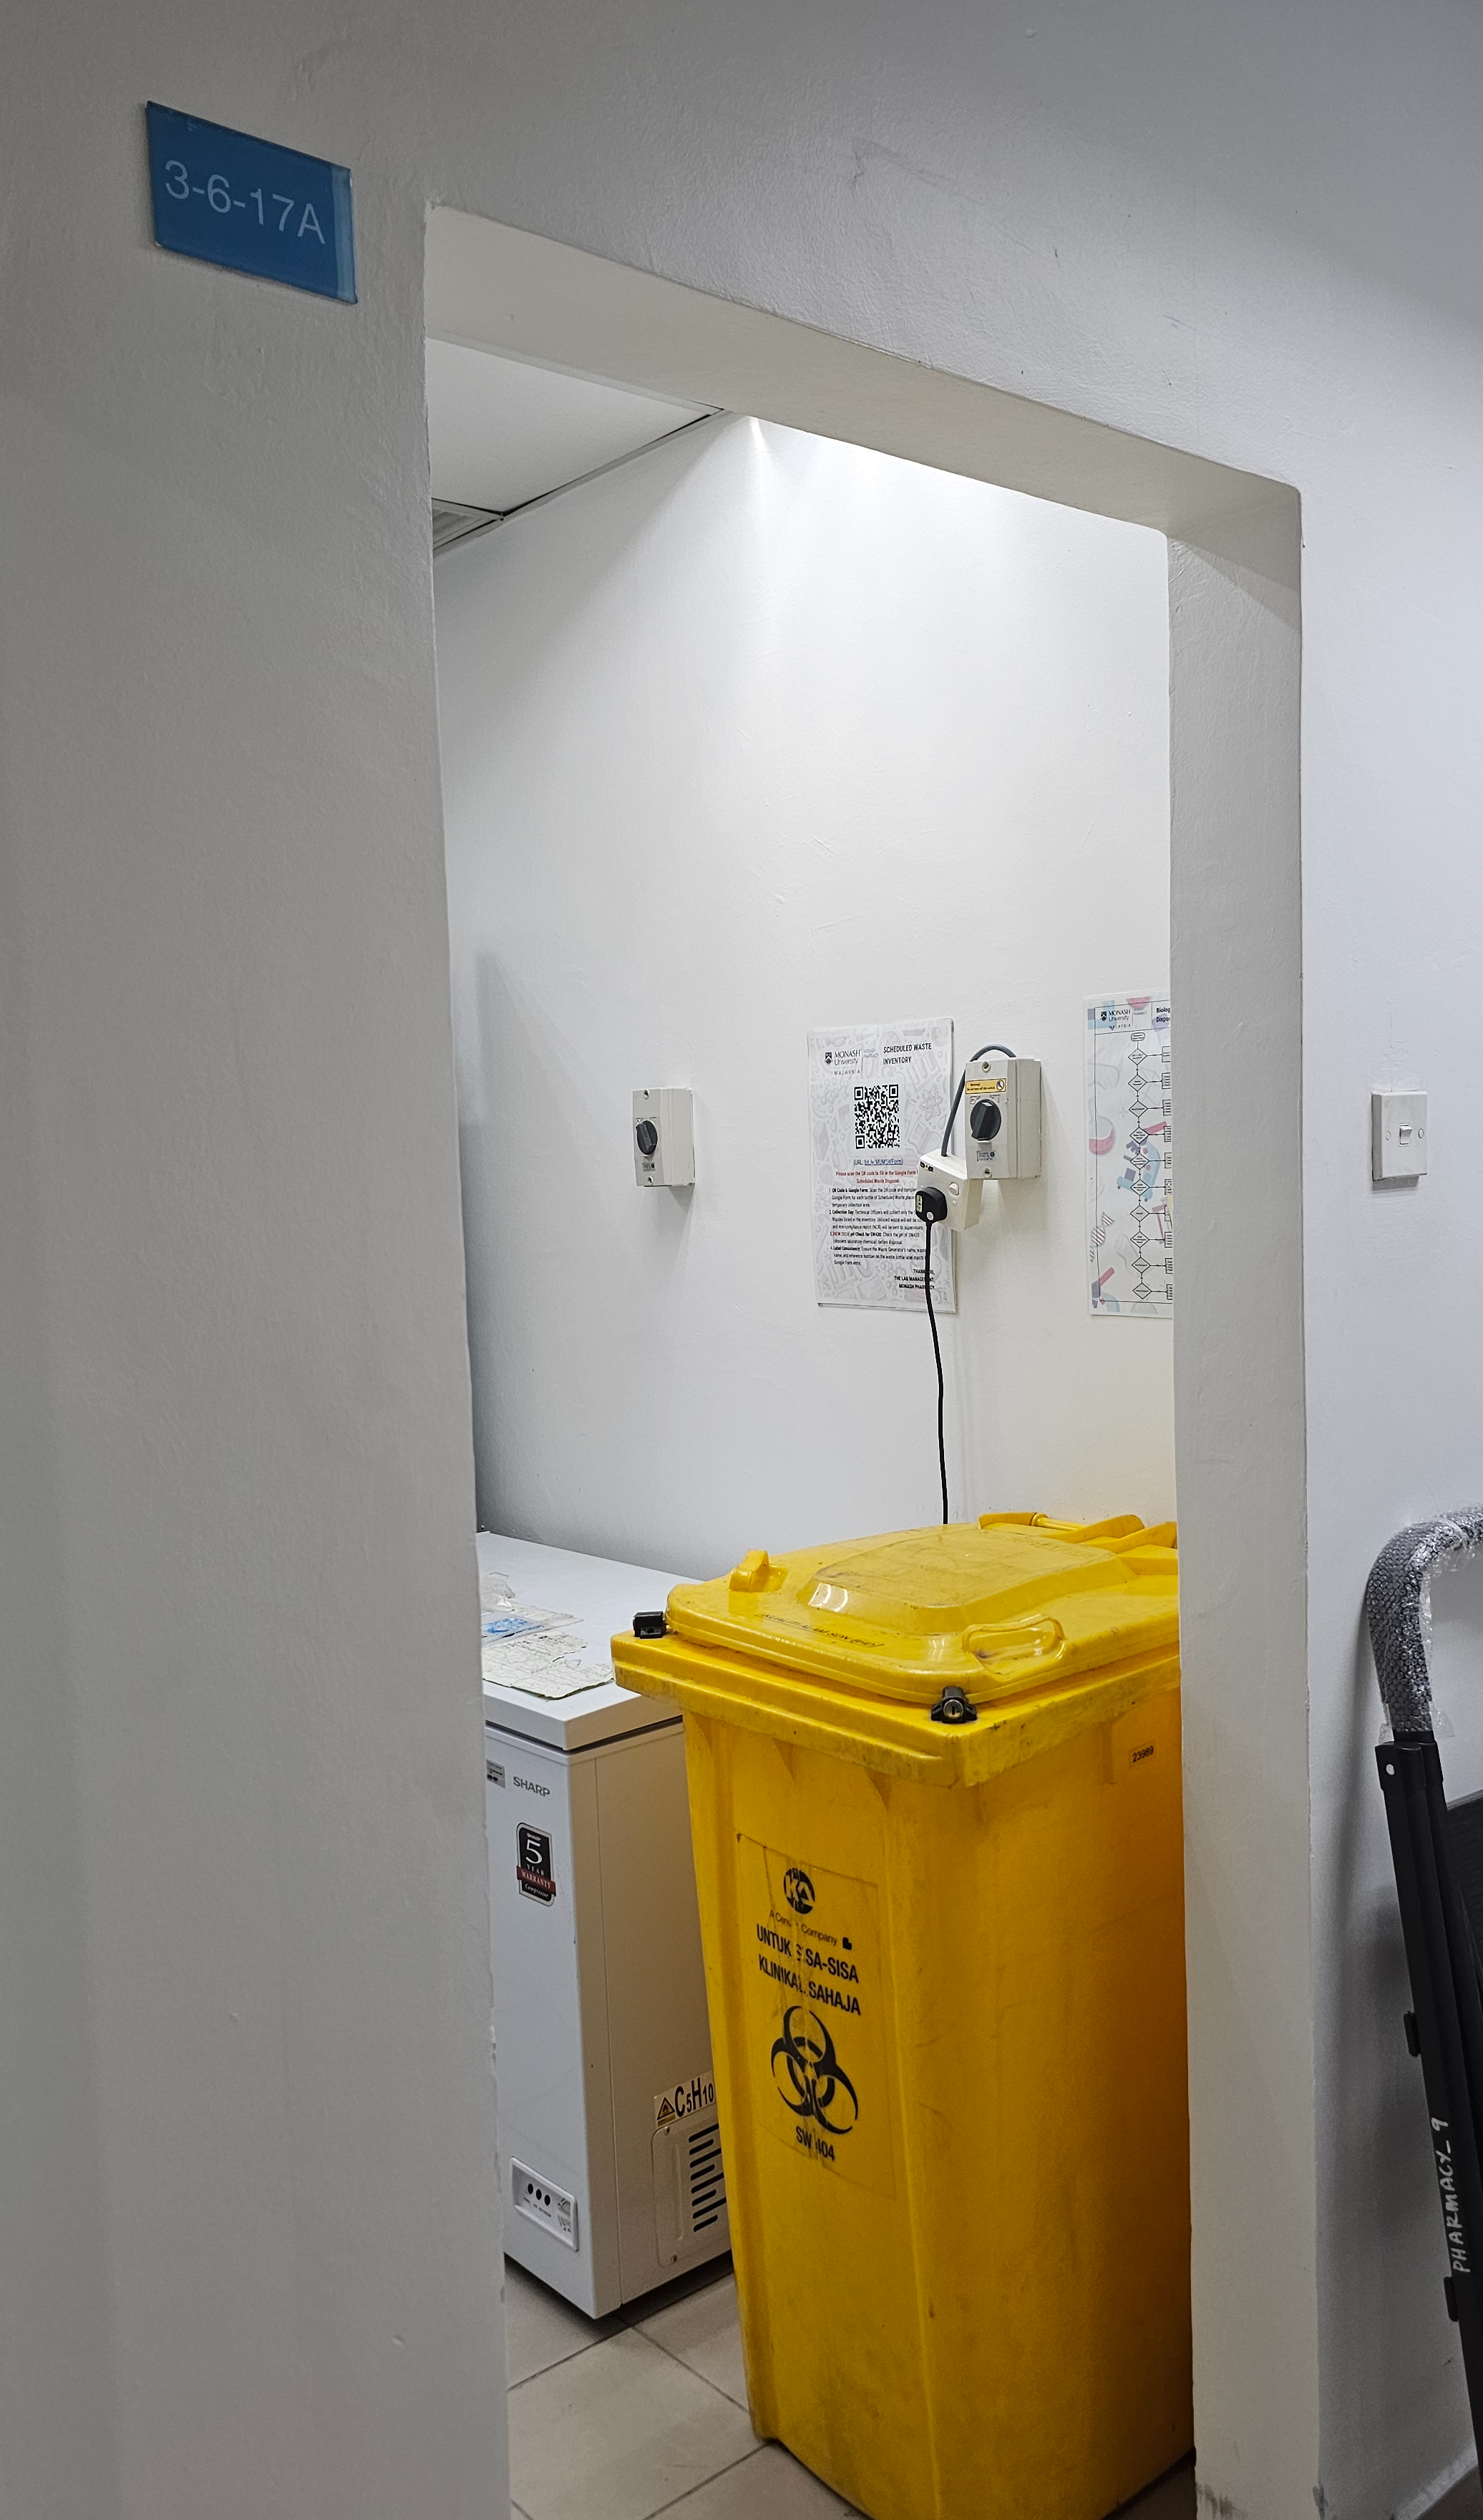
3-6-17A, bin just inside the door
The cold room: 4-6-15
Flowchart and scheduled waste QR on the door. Two yellow SW 404 bins inside.
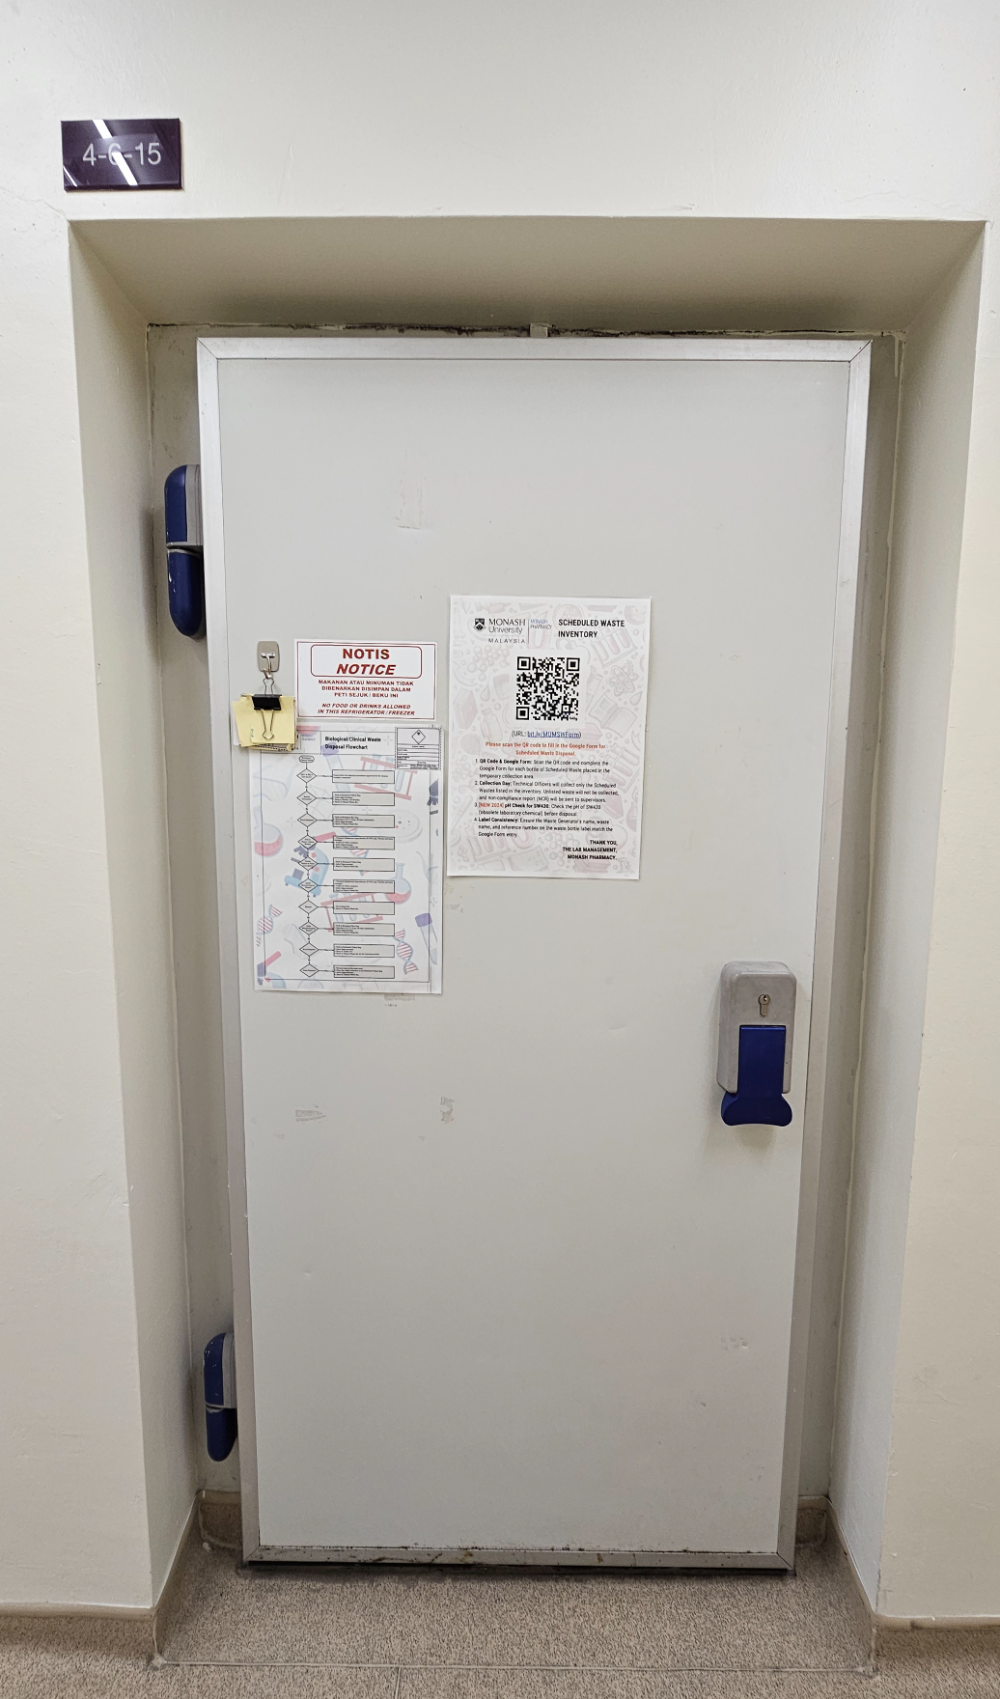
4-6-15, posters on the door
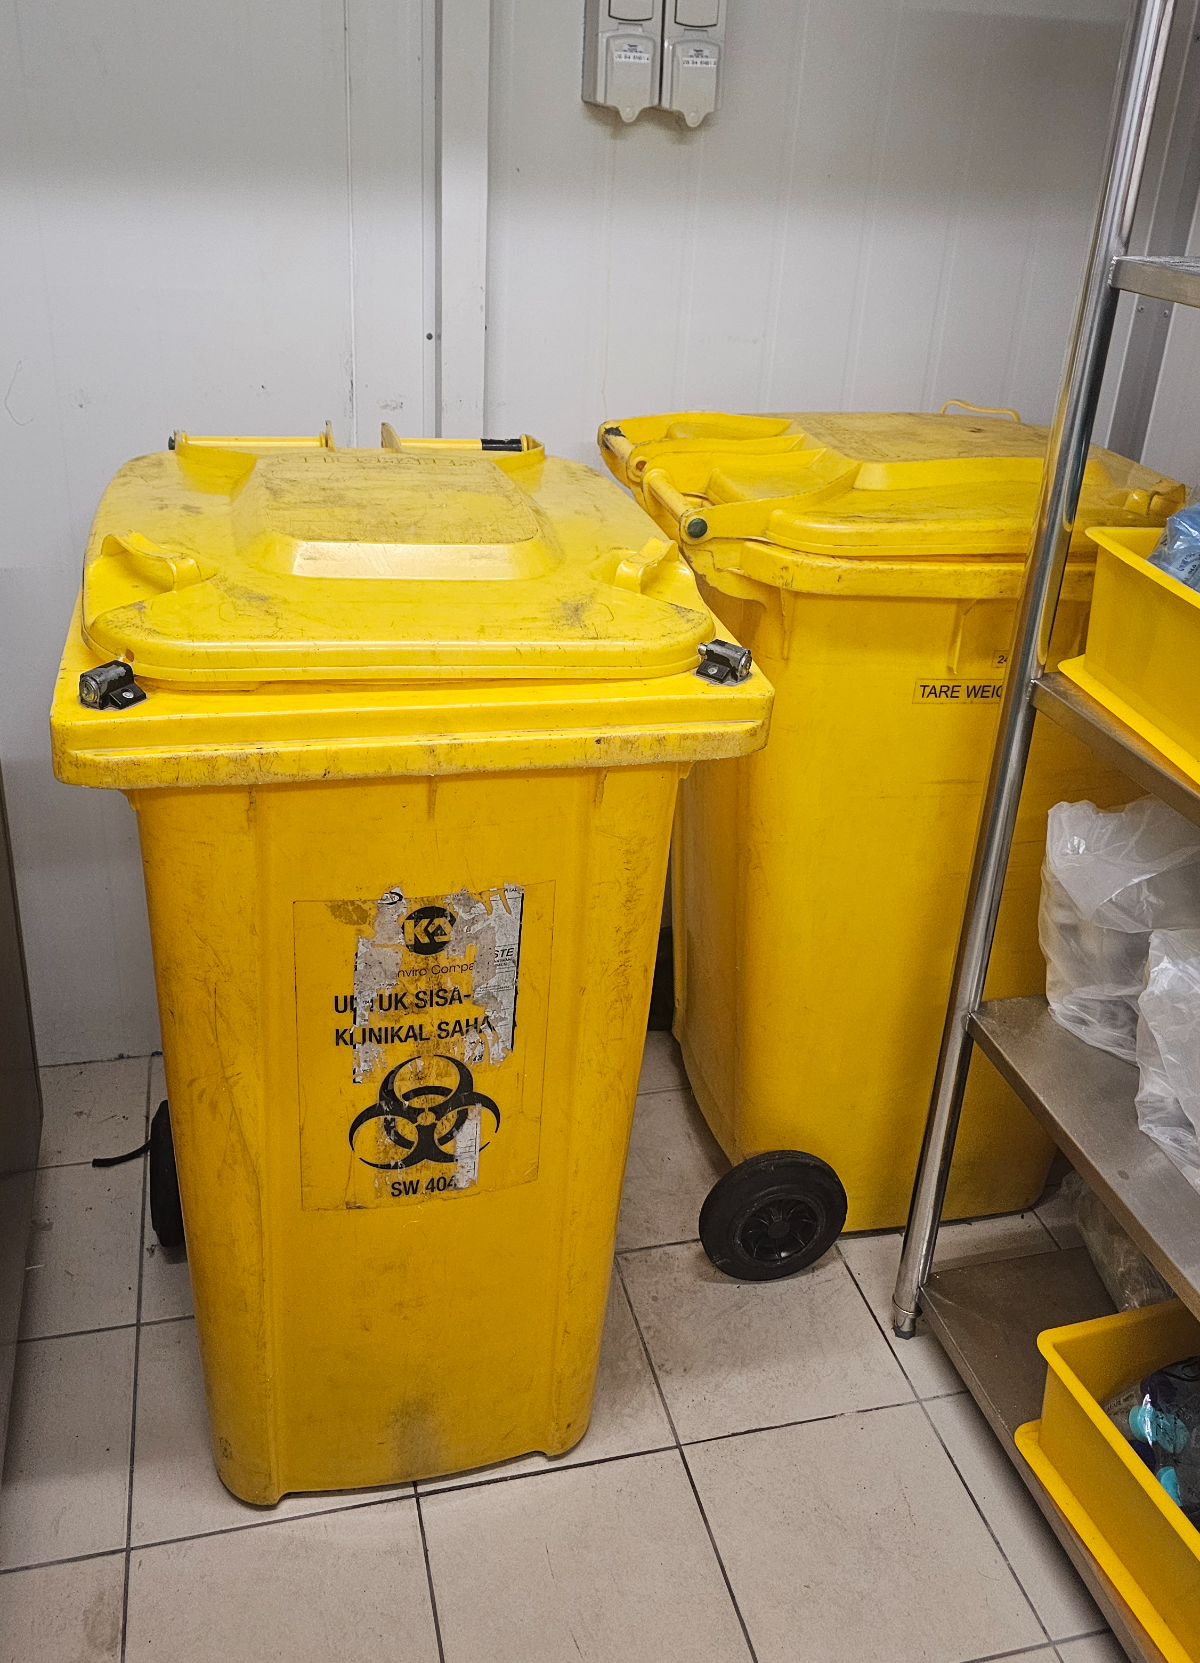
Two SW 404 bins, right one takes liquid clinical waste
- Flowchart and scheduled waste QR are on the outside of the door
- Two SW 404 bins; the right one takes liquid clinical waste
- No food or drinks in this refrigerator, ever
Chemical waste: 4-6-10
Chemical Store 2. Liquid chemical waste goes in the ventilated cabinet marked as the scheduled waste temporary storage area.
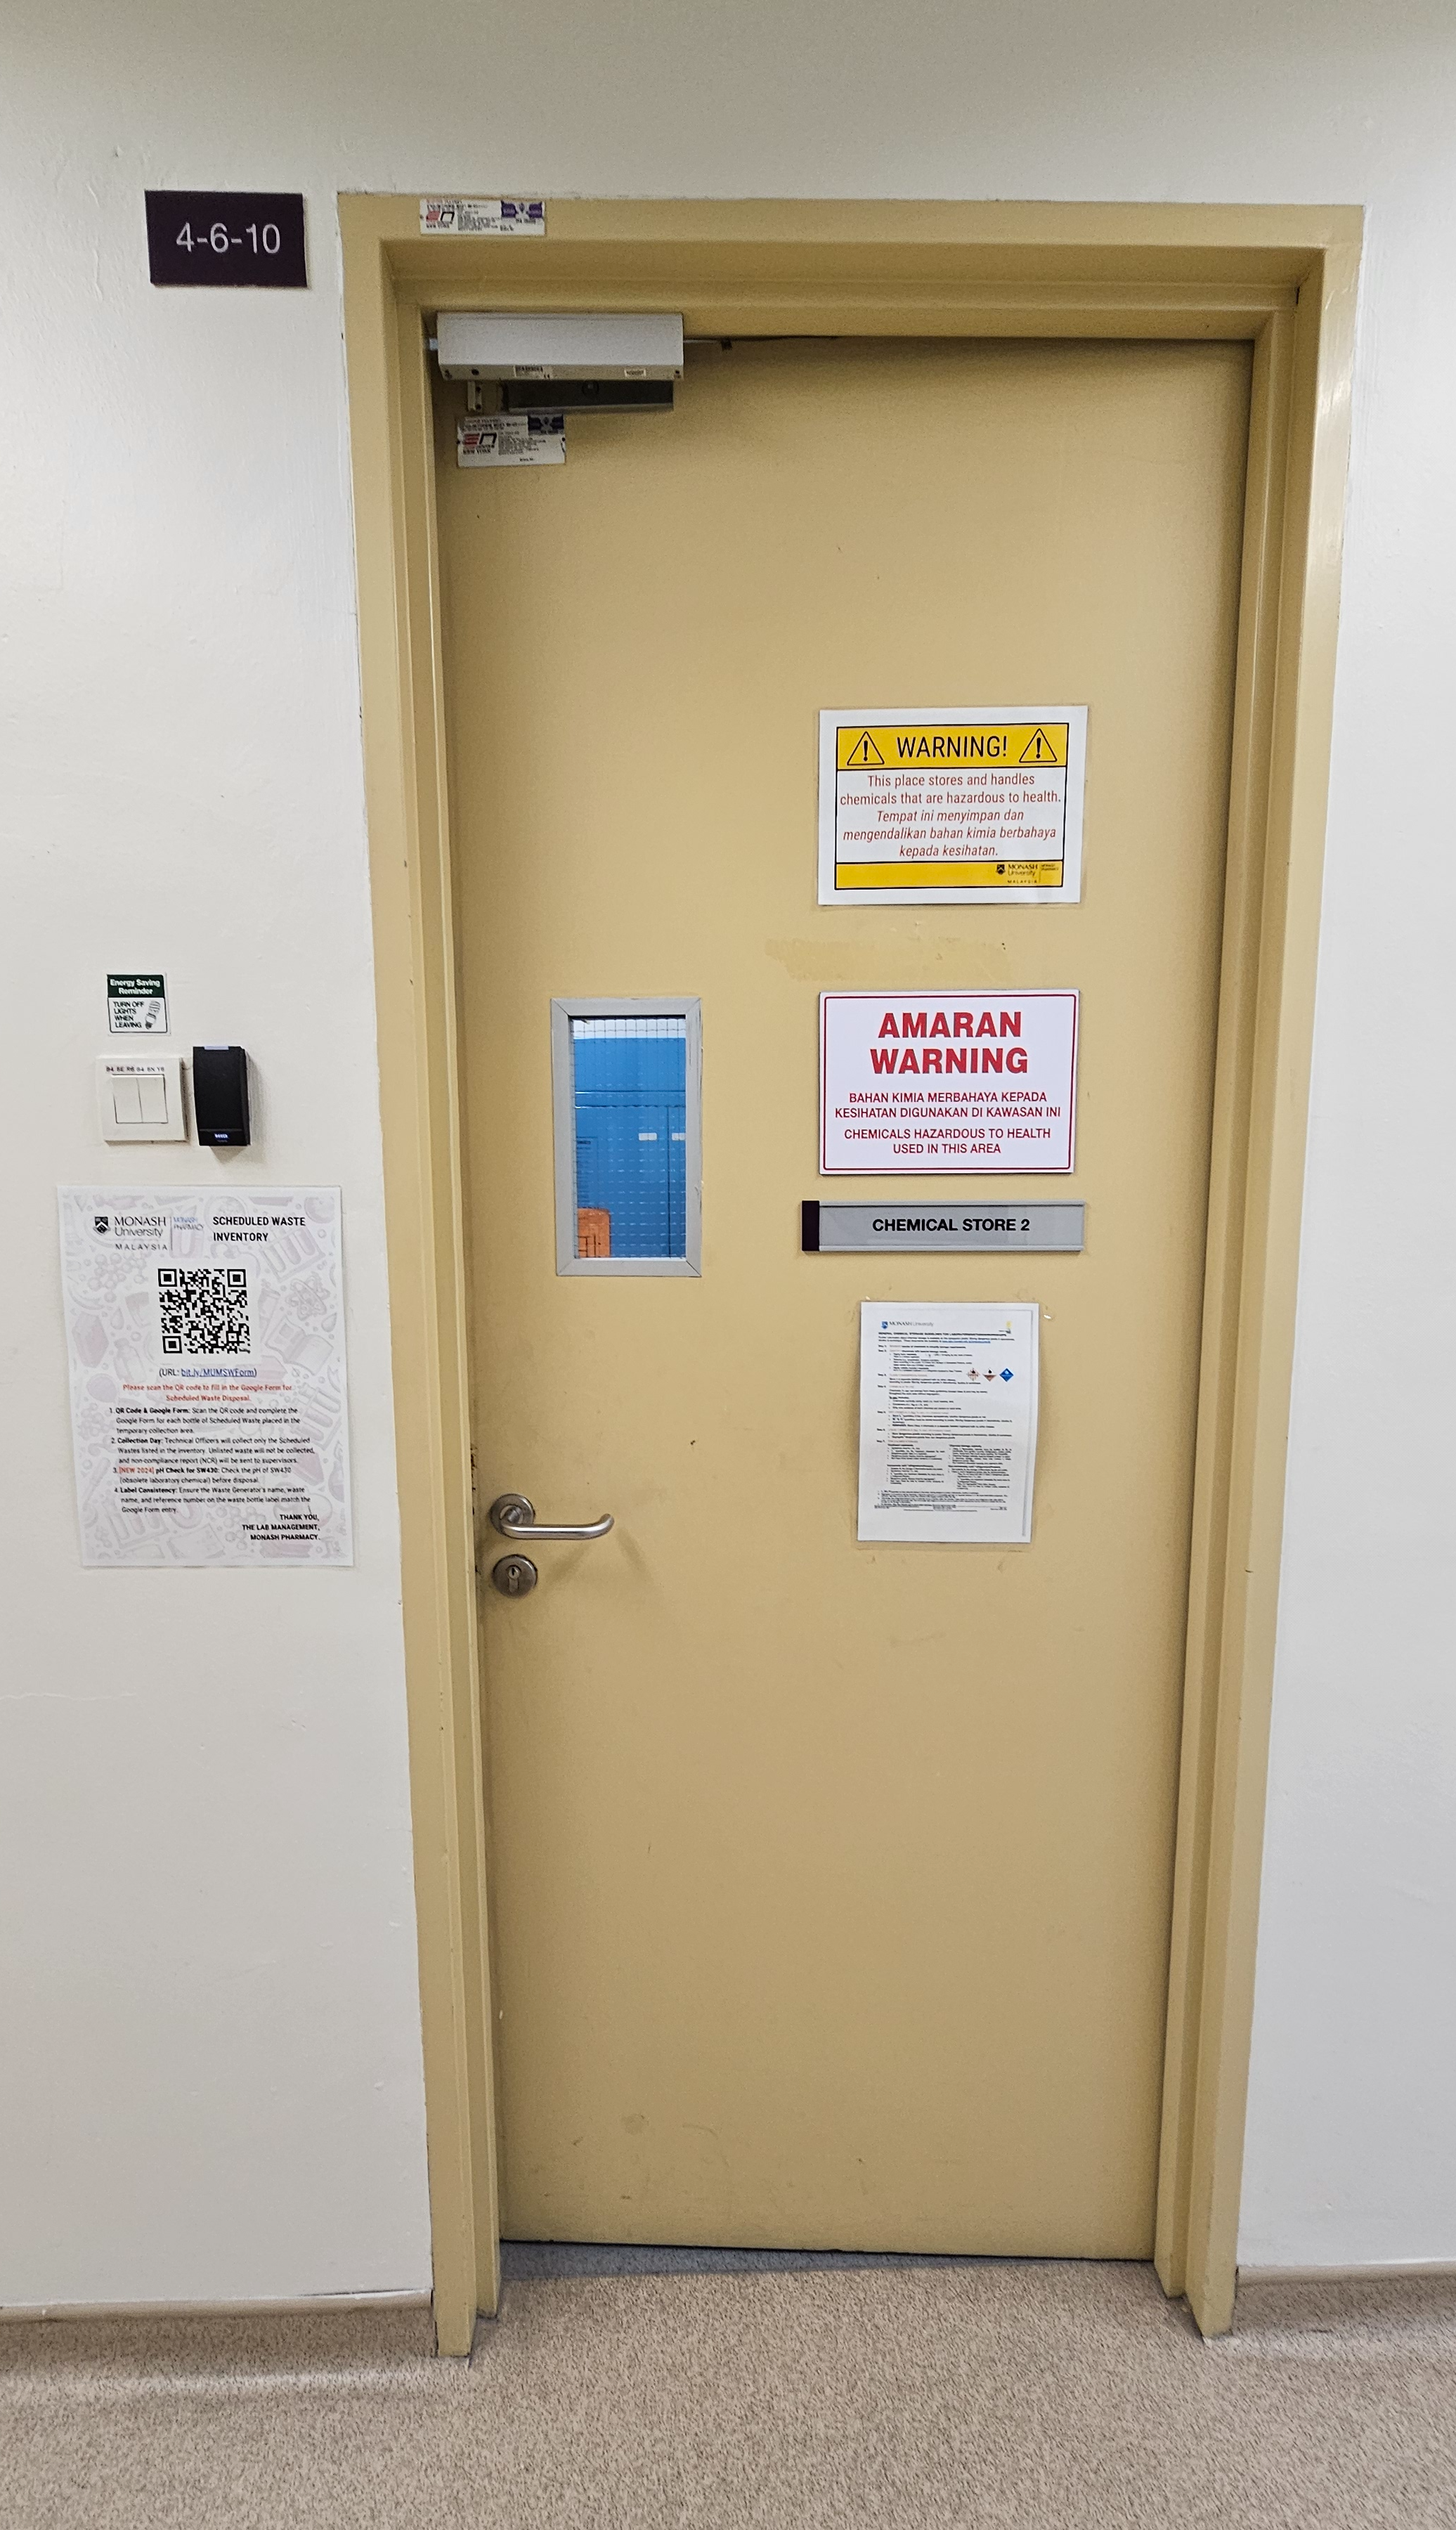
4-6-10. Chemical Store 2, card access
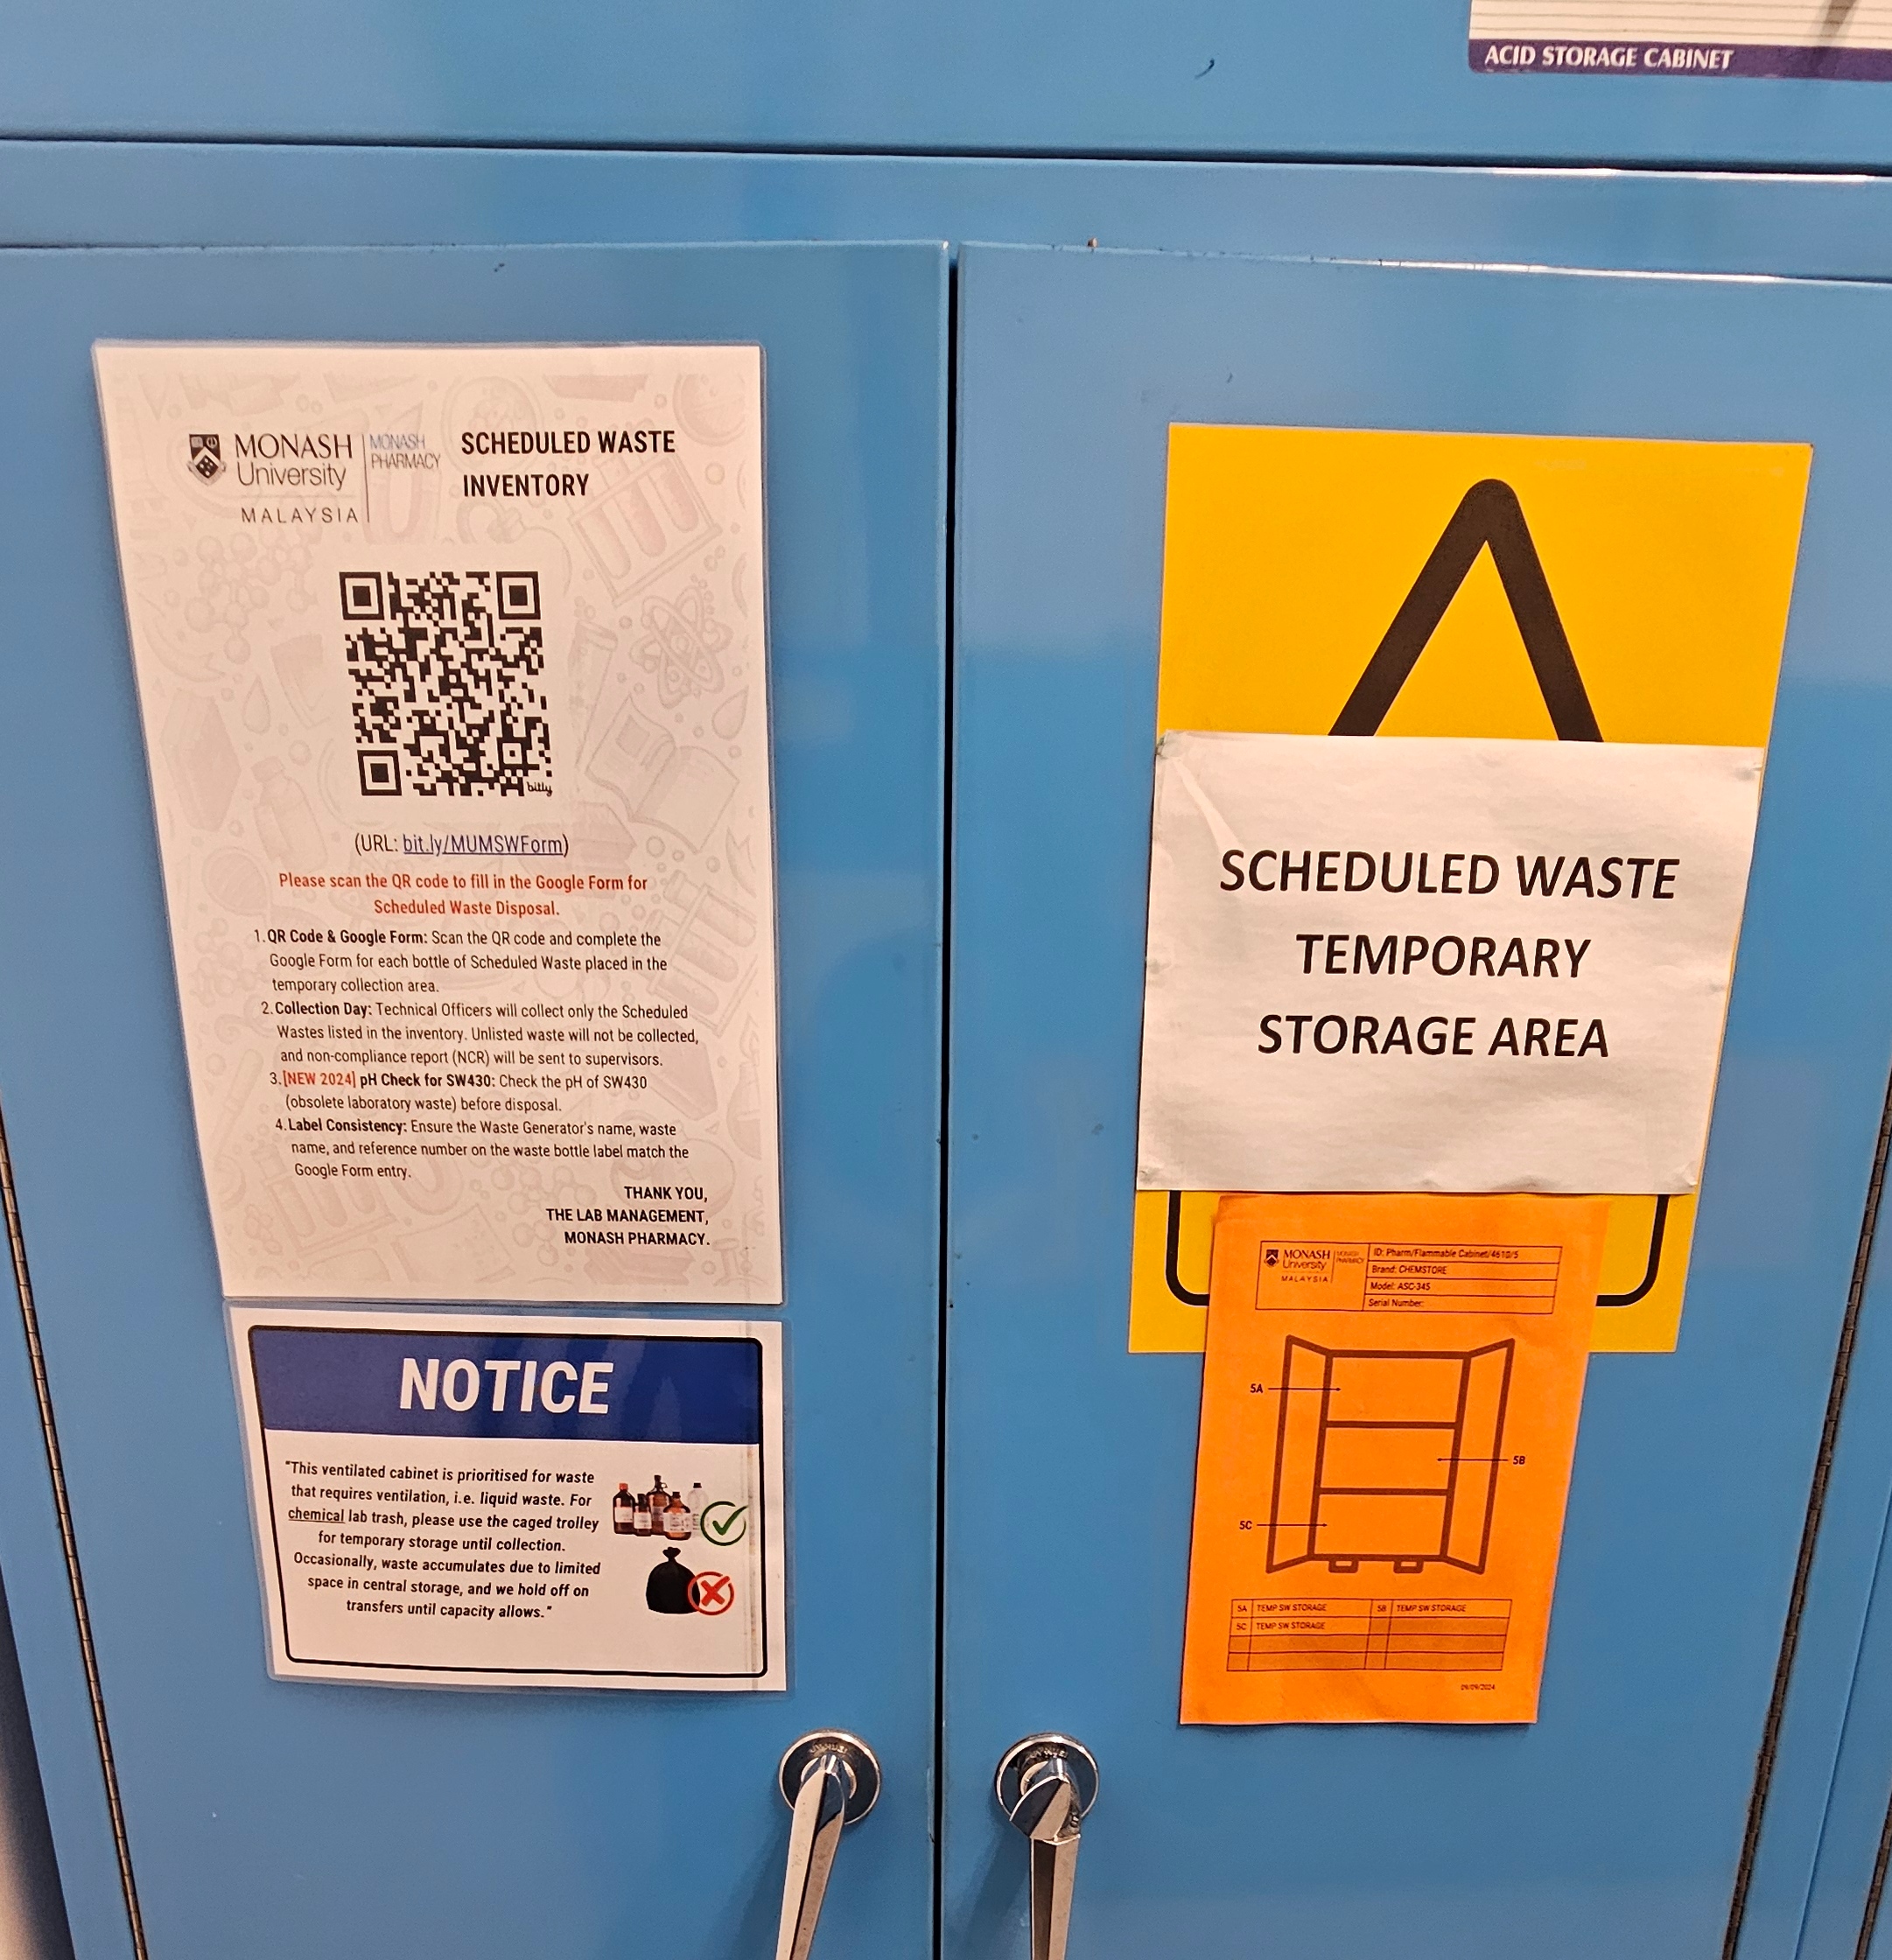
Ventilated cabinet, liquid waste first
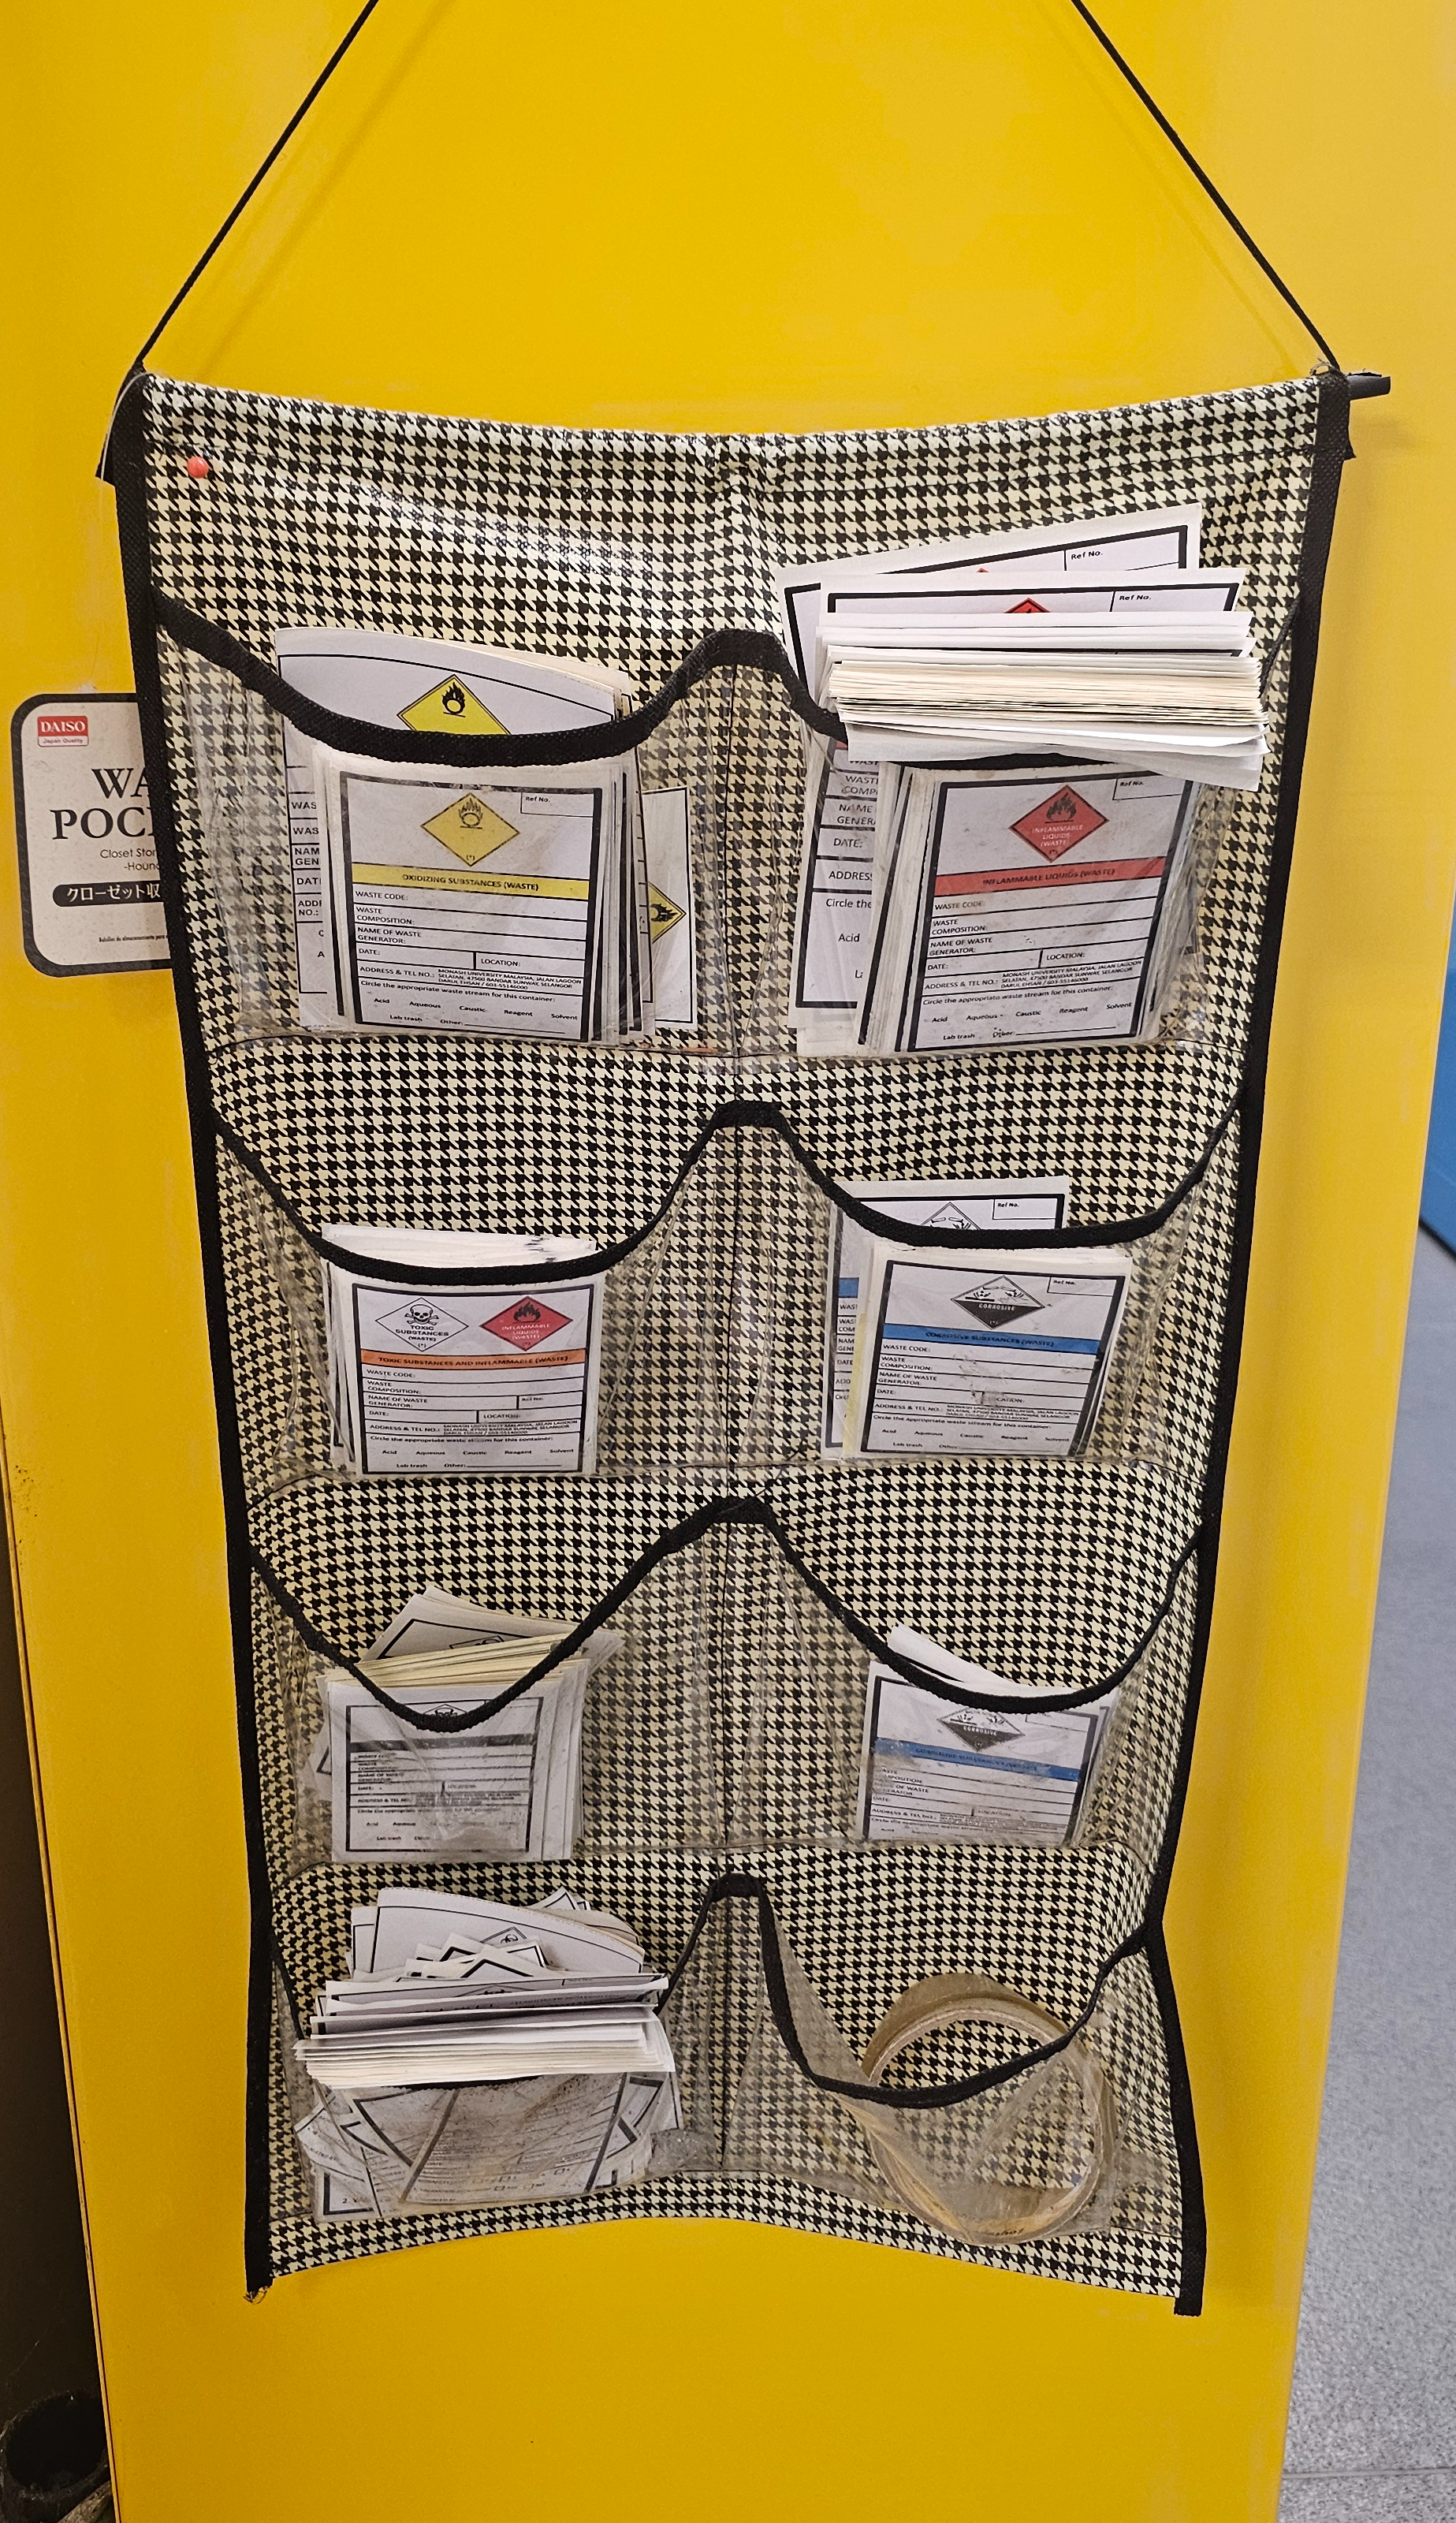
Blank labels by hazard class: take one and fill it in
Every bottle left here needs a Google Form entry, scan the QR on the poster. Unlisted waste is not collected, and a non-compliance report goes to your supervisor.
Chemical lab trash: 4-6-09
Chemical Store 1, next door. The caged trolley holds chemical lab trash until collection.
What goes here
- Chemical lab trash, gloves, tips, paper, contaminated packaging, in a normal trash bag, no biohazard logo, on the caged trolley
- Empty chemical bottles are lab trash: rinse them and place them on the stainless steel trolley beside the cage. Never loose in a bag, where they break
- Tie the bag, no free liquid, no sharps, no broken glass, and log it on the scheduled waste inventory form, scan the QR
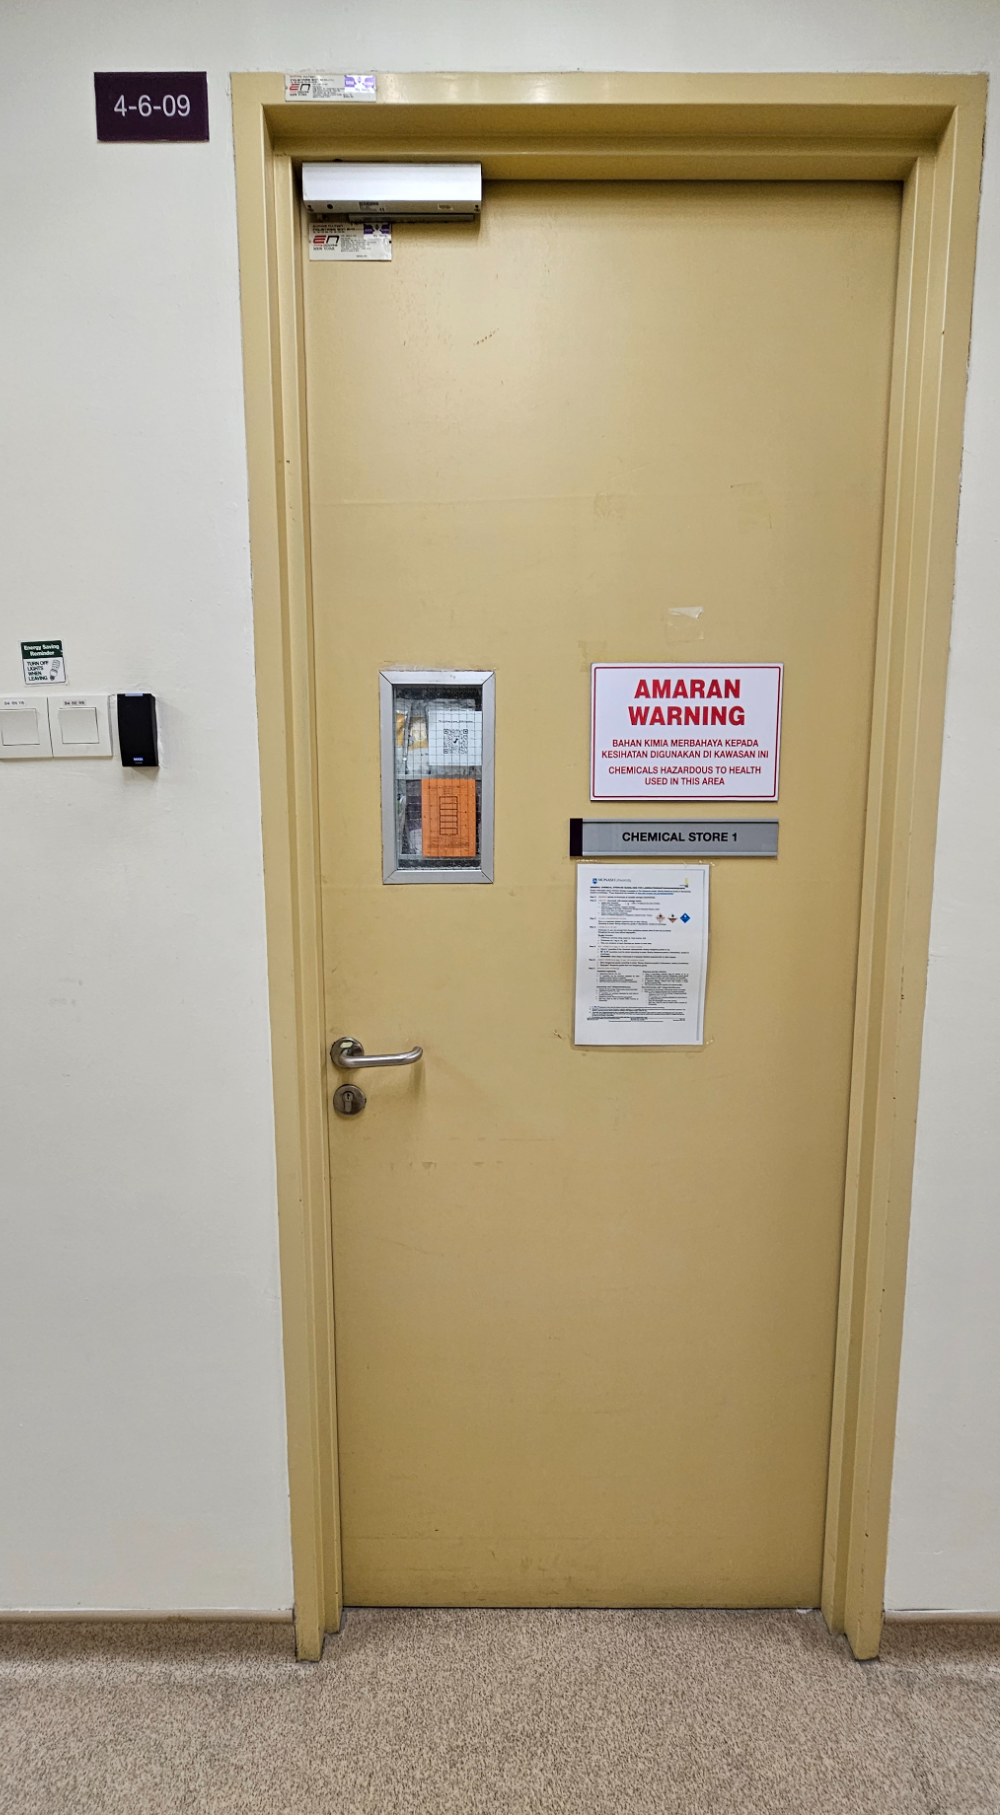
4-6-09. Chemical Store 1
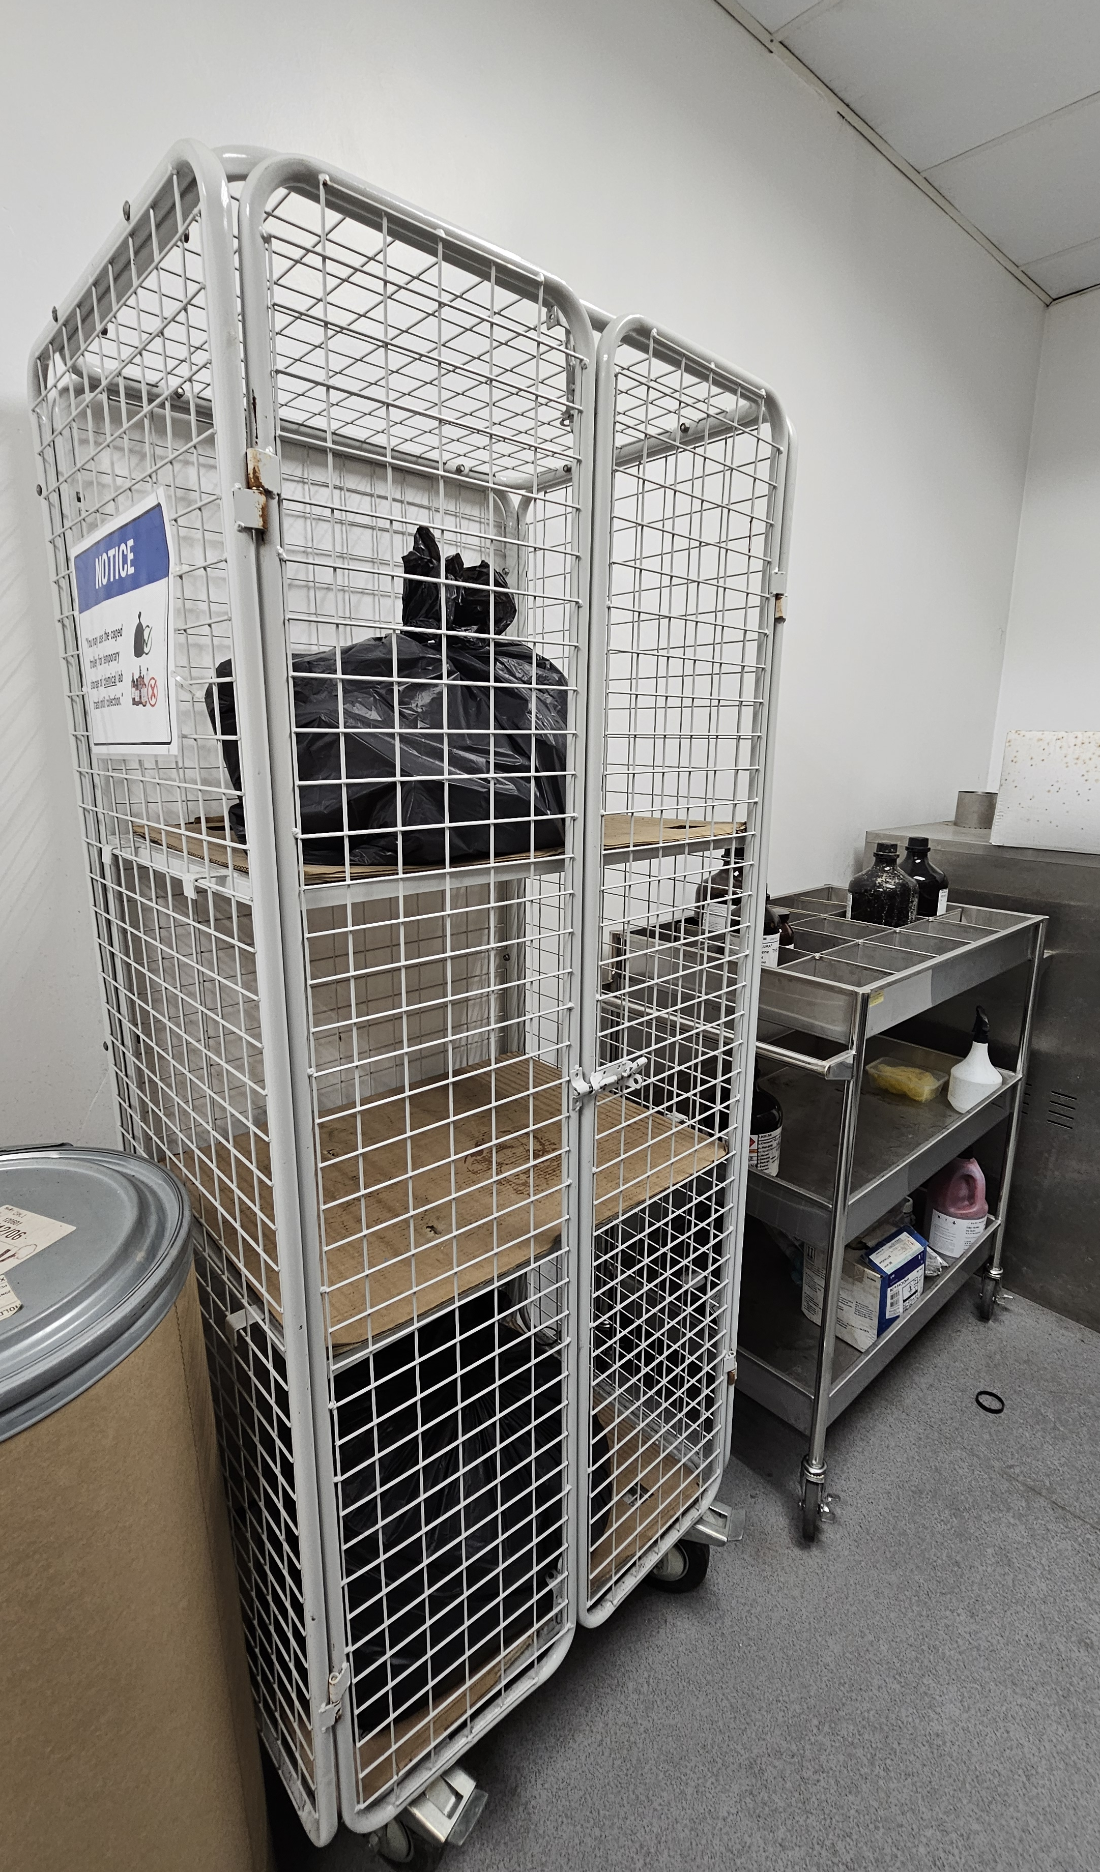
Caged trolley for bags, steel trolley for bottles
The confidence curve
Nobody is careless on day one. The risk arrives with confidence, know where you are on this curve. Confidence is not a control measure.
Pick your answer, then click the three cards
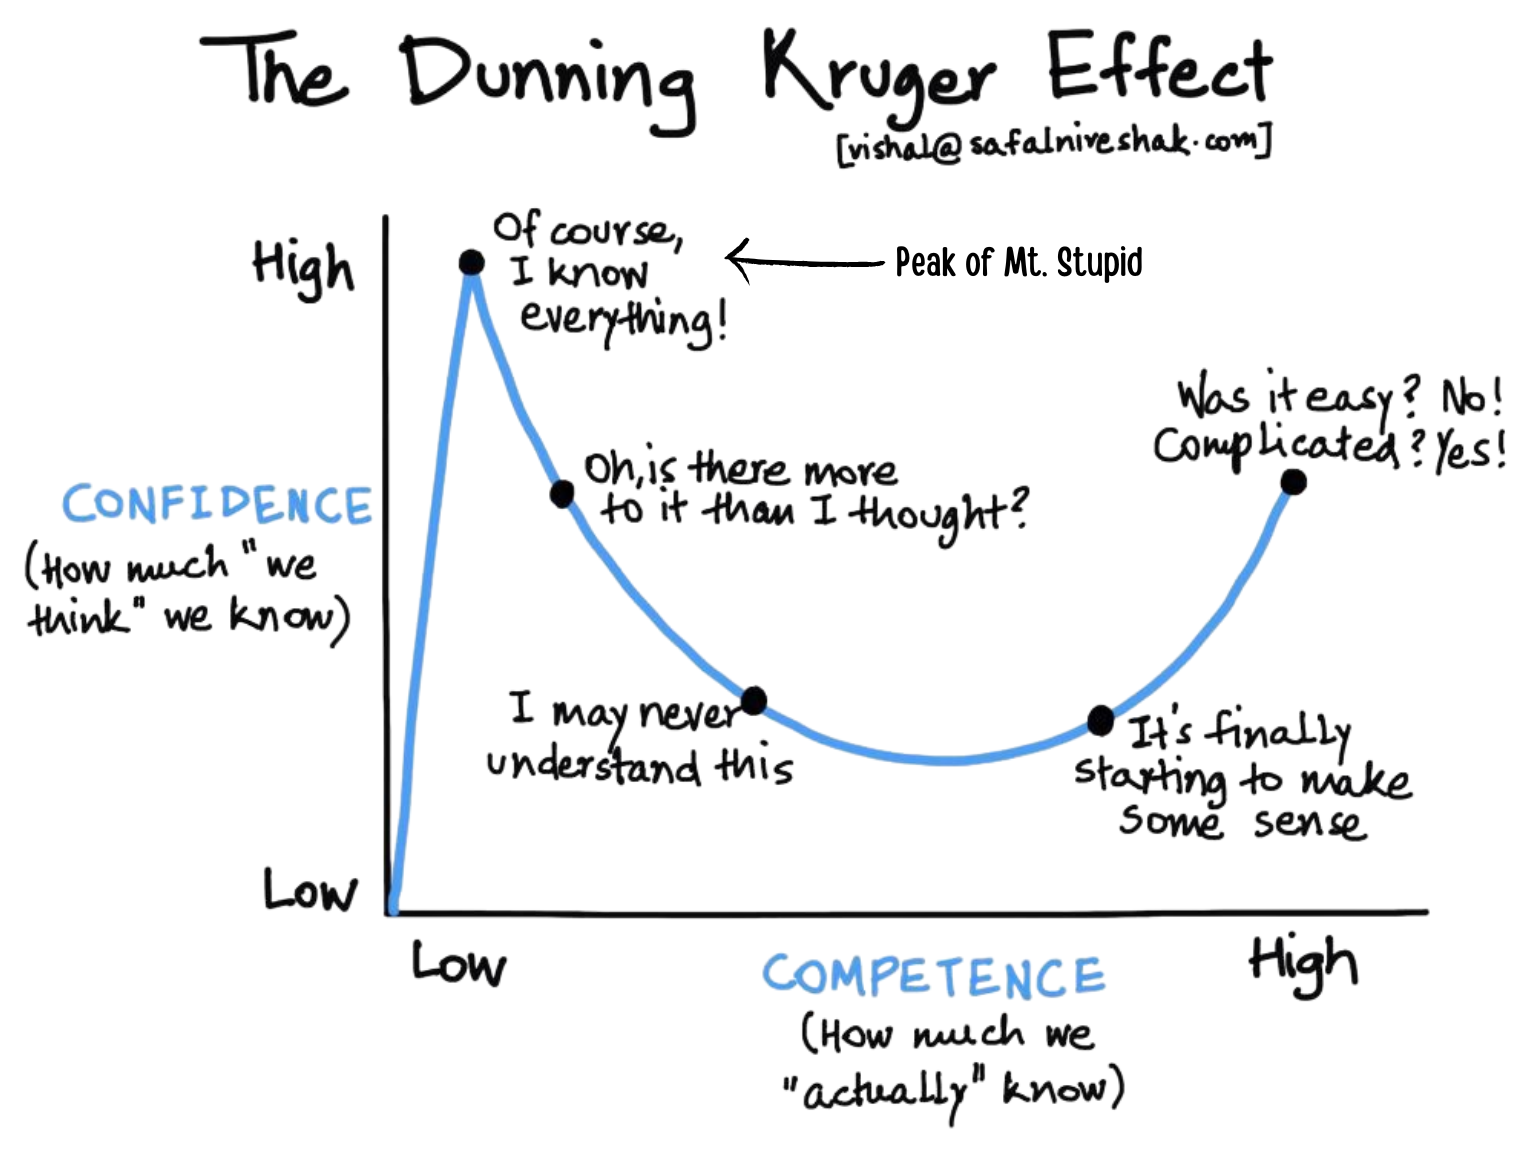
Careful by default
You read every step and ask before every move. Risk: low.
It feels routine
The SDS goes unread, the sash creeps up. Risk: highest.
You know what fails
You have seen a near miss, so you check without being told. Risk: low again.
Before you start work
Three things to do this week. Scan a code with your phone, or click it here.
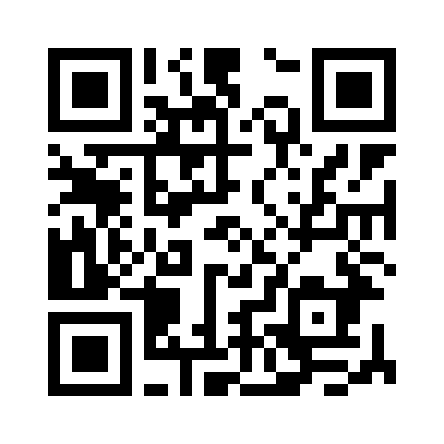
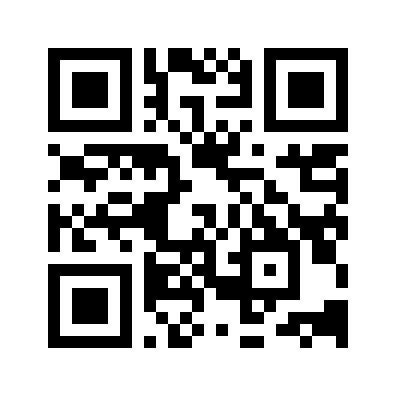
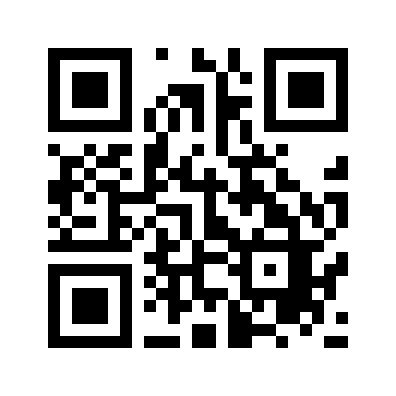
Then request your Lab Safety Passport on the OHSE Asana form, at least 30 days ahead. Tissue culture work also needs Dr Ronald's briefing.
The appendix follows this slide: fume hoods, autoclaves, biosafety cabinets and the reference links. Read those before your first use of the equipment.
Then the quiz, on the last card of this module. It is the record that you completed the induction.
Fume hoods
- Work inside the hood. Every operation involving hazardous chemicals.
- Keep storage in the hood to a minimum. Chemicals and apparatus both disturb airflow.
- Sash closed whenever the hood is not in use.
- Minimise foot traffic and other air disturbances past the hood face.
- No ignition sources inside the hood when flammable liquids or gases are present.
- Use the sash as a shield when boiling liquids or working with reactive chemicals, and still wear your safety goggles.
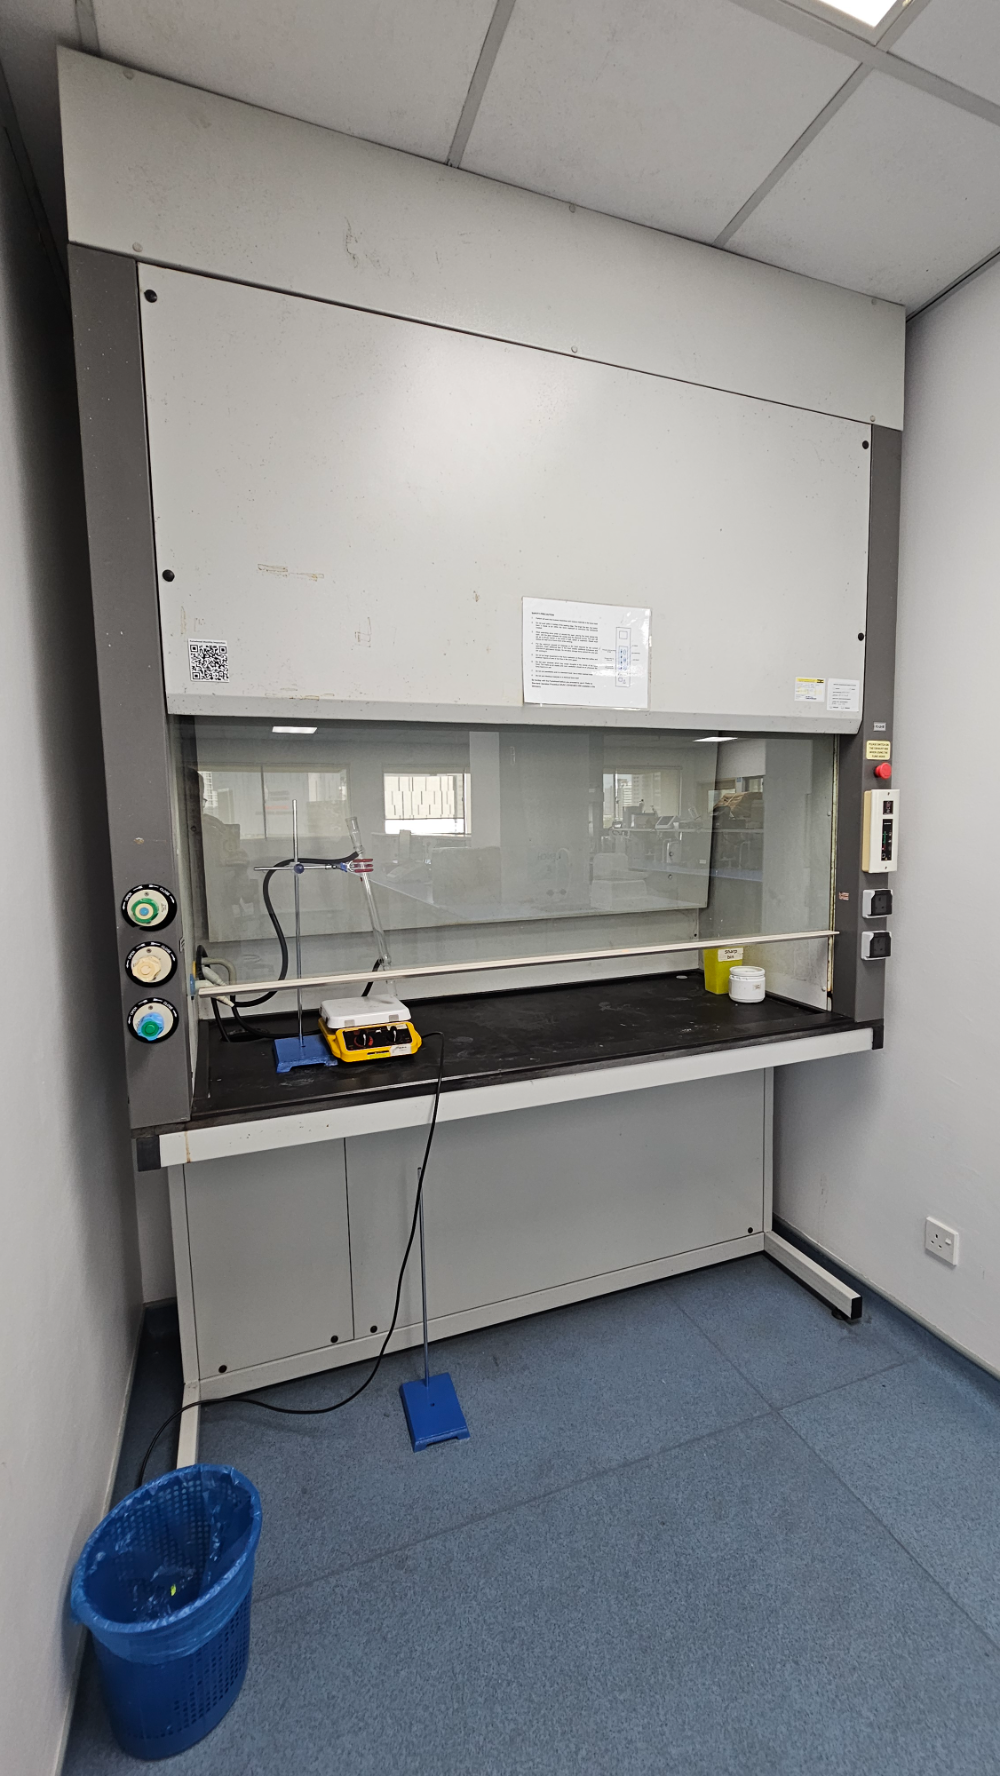
Esco fume hood
Autoclaves
High-pressure, high-temperature steam to kill microorganisms and inactivate biohazardous material. If you have never operated ours, contact laboratory management first.
The risks
- Heat and steam burns; scalds from hot fluids
- Hand and arm injuries from the door
- Bodily injury from an explosion
- Exposure from badly packaged waste
Never autoclave
- Broken glass · Sharps, they puncture the bag
- Chemicals, heat drives off toxic vapour
- Dried bleach, releases chlorine gas
- Nitrocellulose, explodes under heat and pressure
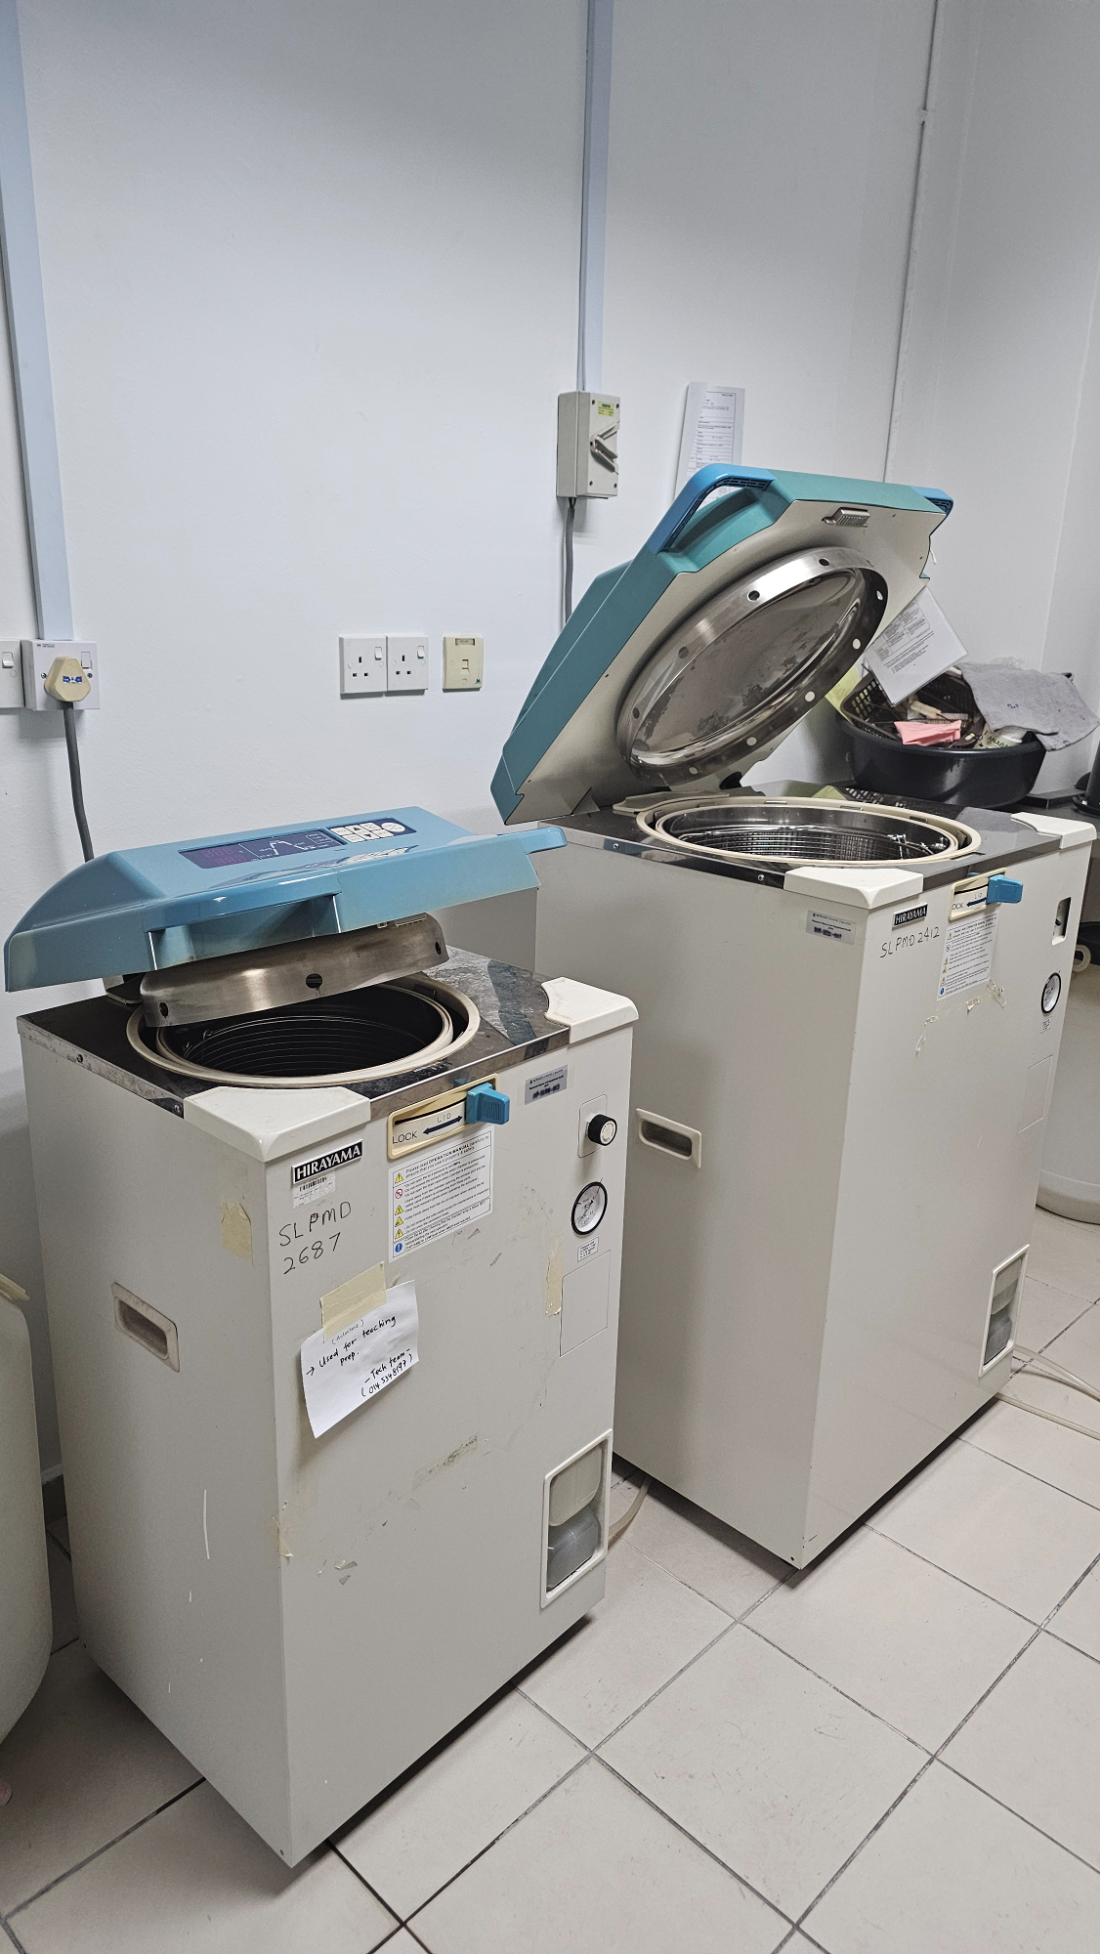
Hirayama autoclaves, 3-4-14
Heat-insulating gloves, lab coat and closed-toe shoes prevent most burns. Bags are not stocked, ask your supervisor.
Autoclave your own waste in 3-4-14; staff only run teaching waste. After the cycle, fill in an SW 404 sticker, kept at both yellow bin areas, then store it in the bin.
Biosafety cabinets
For a spill: tell your Technical Officer, follow the spill management procedure, then rinse with sterile water to prevent corrosion.
- Disinfect the work surface before and after every session.
- Disinfect or sterilise everything you bring into the cabinet.
- Disinfect gloves after touching any non-sterile surface outside the cabinet.
- Practise aseptic technique throughout.
- Never block the air intake grilles at the front or back of the work surface.
- Do not store materials in the cabinet: they disrupt airflow.
- Keep cabinets out of high-traffic areas and away from doors, and avoid volatile chemicals inside them.
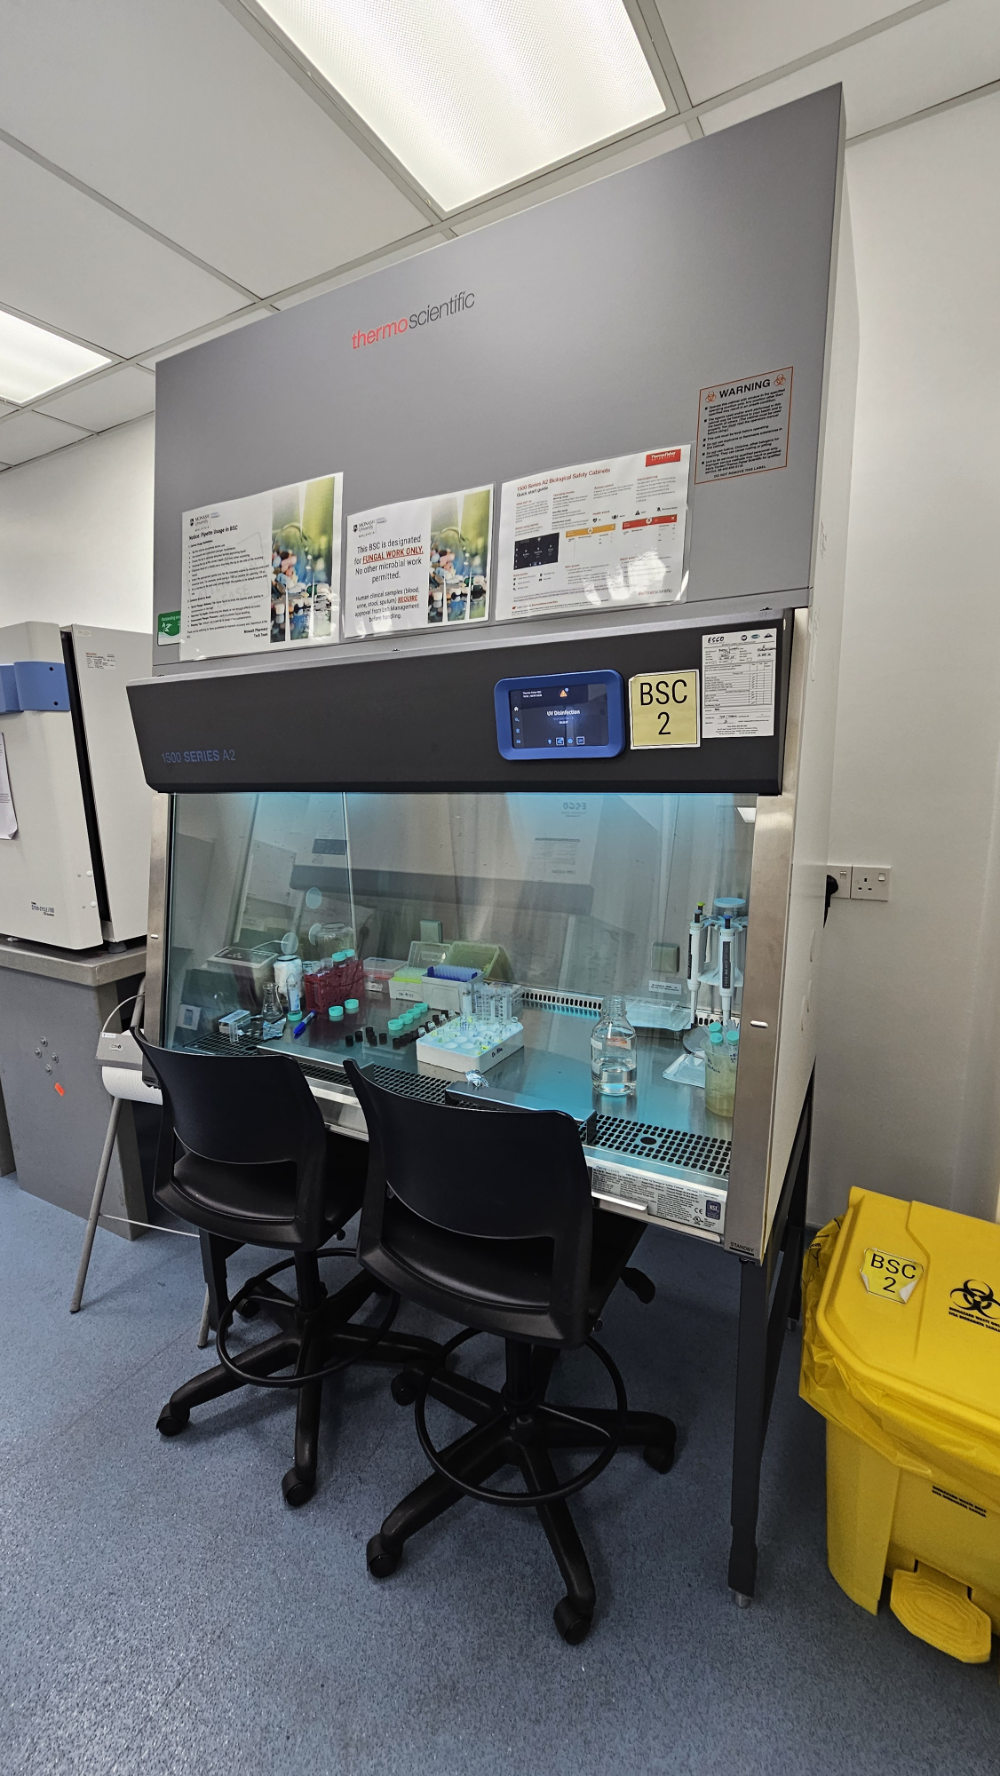
Thermo Fisher biosafety cabinet
PPE reference poster
High-hazard PPE on the left, the everyday minimum on the right. Full-size copies are posted in the lab. Contaminated PPE may be hazardous waste, and never goes home.
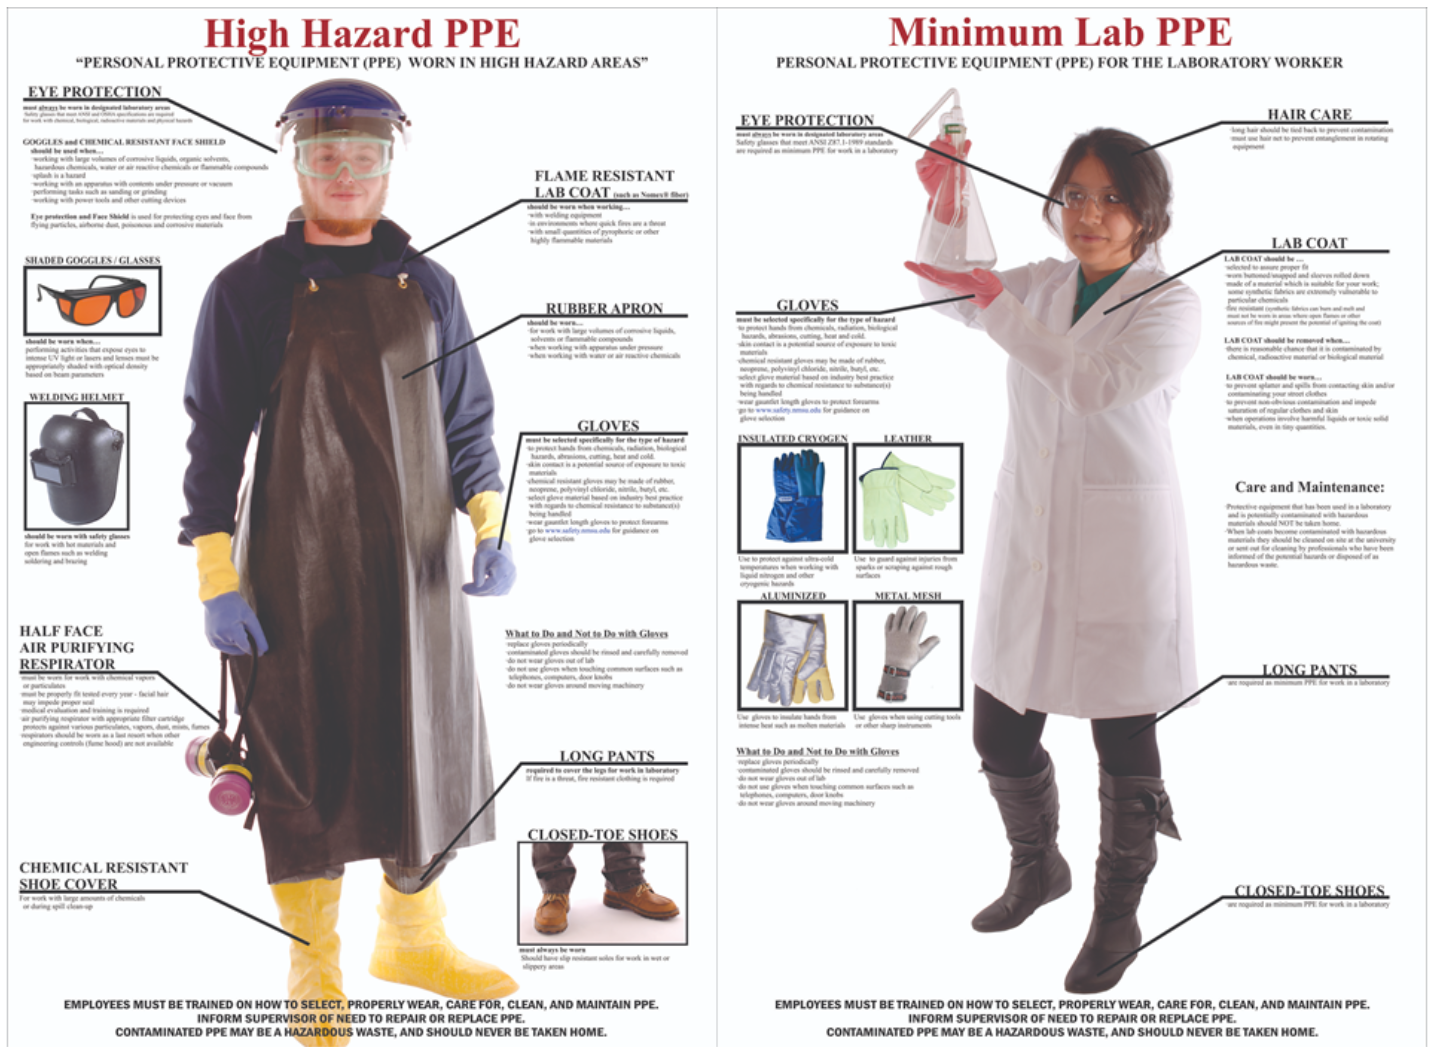
Ask a technical officer if you are unsure which column your work sits in
MonashPharmacy
Be safe and
stay safe
Ask the lab staff anything, at any time. Nobody in this school would rather you guessed.
CRICOS provider: Monash University 00008C
MonashPharmacy
You have reached the end
Now take
the quiz
The quiz is the only record that you completed this induction. You can repeat it until you pass, and you keep access to this module the whole time.
Open the induction quiz
bit.ly/MUMPharmInductionQuiz1
CRICOS provider: Monash University 00008C
This induction is a condition of laboratory access at the School of Pharmacy, not a formality. Work through it at your own pace, then take the quiz at the end. The quiz is the record that you completed the induction, so nothing counts until you have passed it.
Everything here applies to every person who enters a School of Pharmacy lab: staff, postdocs, research assistants, higher degree by research candidates, final-year and honours students, exchange students and research volunteers.
Monash acknowledges the Traditional Owners of the lands on which the University's Australian campuses stand. Take a moment to read this, then continue.
Four parts, then an appendix. Part one is the paperwork that gets you into the lab. Part two is what you do every day at the bench. Part three is what to do when something goes wrong. Part four is chemicals and waste, which is the longest part because most of what we handle lives there.
The appendix is not optional reading. It covers fume hoods, autoclaves and biosafety cabinets, and you are expected to read the relevant page before you use that equipment for the first time.
Paperwork comes first, because until it is complete you cannot legitimately be in the lab. There are three documents in play, and which ones apply to you depends on the kind of work you do.
Find yourself in the first column. Lab-based means your work puts you at a bench, and you complete all three items: the Laboratory Safety Declaration Form, a risk assessment on S.A.R.A.H.+, and a Lab Safety Passport request. You also need a local induction with your Principal Technical Officer, Senior Technical Officer or Technical Officer, who will show you the room you will actually work in.
Non-lab-based means you are not at a bench. You still complete a risk assessment on S.A.R.A.H.+ and lodge the PDF.
The risk assessment is not a one-off. It must be formally reviewed at least every three years under the HSW Risk Management Standard, and sooner if your procedure, your chemicals or your equipment change. If you work with tissue culture, there is an additional briefing with Dr Ronald and he will contact you directly.
The Lab Safety Passport is the newest requirement and the one people get caught by. It has been in force since 23 February 2026, and without an approved passport your card will not open the chemical laboratories.
Submit at least a month before you need access, not the week before. The three prerequisites all take time: Chemwatch SDS and Chemical Register training, a risk assessment on S.A.R.A.H.+ named in the MUM-SOP format, and an updated Chemwatch inventory. Attach your training completion to the Asana form.
Two things people miss. The requestor is the person named on the form, and that person carries responsibility for the lab, the equipment and the activities for the whole approved period, so do not put someone else's name down. And once approved, stay in the room you requested. Working in a room you were not approved for blocks any further requests for the rest of the semester.
This is the part that matters most day to day. If you remember nothing else from this module, remember this section.
Five rules, and the first one has an order to it. Report every accident, however minor. Go to your supervisor first. If your supervisor is not there, tell any lab staff member. If neither is available and it is serious, call 333 from an internal phone or +603-5514 6333 from a mobile. Save both numbers into your phone now.
Bags in the hallway are not a tidiness issue. They trip people who are carrying things, and they block the fire exit at the moment it matters most. Use the lockers, under the benches, or the cupboards.
Do not work alone. If you are not staff and you need to work after hours, the after-hours form is mandatory, not a courtesy.
Two families of hazard, and they do not share controls. Biological hazards transmit and multiply, which is what makes them different: a small contamination becomes a large one on its own.
Read the second half of the chemical definition carefully. Flammability, corrosivity and oxidising behaviour hurt you without ever entering your body. A substance does not have to be toxic to injure you.
Match the containment to the material. A fume hood protects you from chemical vapour. A biosafety cabinet protects both you and your work from biological contamination. A fume hood is not a substitute for a biosafety cabinet, and using one for biological work protects nobody.
Two people use the same solvent every day. One gets a headache by lunchtime; the other feels nothing for twenty years, then gets ill. Which one is being harmed more, and which one would you notice happening to you?
Harm is not toxicity alone. It is concentration multiplied by contact time, and contact time is the half you control. That is why the hood and the gloves matter on the days when nothing feels risky.
The two panels describe two very different problems. Acute exposure announces itself. Chronic exposure does not: years of small, unremarkable exposures produce cancer, chronic obstructive pulmonary disease and neurological damage, and nothing along the way tells you it is accumulating. Nobody has ever noticed a chronic exposure in the moment.
Then the odour point, which is the most common mistake of all. Many substances give no warning at dangerous concentrations. "I can't smell anything" is not a safety check. Use the hood.
The left panel is the minimum for being in the lab at all, and the right panel escalates per task, not per room. The same bench can need safety glasses for one procedure and goggles plus a face shield for the next one.
PPE is worn on the way in, not fetched when something goes wrong. By the time you need it, there is no time to put it on.
Two habits worth naming. Contact lenses are not eye protection. They hold splashed chemical against the cornea and make rinsing harder, which is worse than no lens at all. And gloves come off before you touch door handles, phones and keyboards, because whatever is on the glove goes onto everything you touch next, and then onto the next person's hands.
Closed-in shoes means the whole foot covered. Not sandals, not open toes, not heels.
This poster is on the wall in every lab in the school. It is worth saying plainly why it exists: every rule on it was written after someone was hurt. None of it is arbitrary.
The consequence is real and it is enforced. No PPE, no instrument access and no lab access. Technical staff will turn you away, and they are right to.
Everything so far has been prevention. This part is what you need when prevention has already failed: who to reach, what to do in the first minute, and how to report it afterwards.
Read it now, while nothing is happening. None of it works if the first time you see it is during the emergency itself.
Save these numbers into your phone before you next enter the lab. This module stays available to you, but you will not be scrolling through it while something is going wrong.
Mobiles are for urgent matters, by call or WhatsApp. For anything routine use the office line, extension 45839, which all technical staff share. If nobody answers, call 333 from an internal phone or +603-5514 6333 from a mobile.
For a life-threatening emergency call 999 first for an ambulance, fire or police, then call 333 so campus security can bring them directly to you. That second call is the one people forget, and it costs minutes.
Six things that could happen in your lab this week. Take them one at a time and decide your first action, the one in the first ten seconds, before you tell anyone. Which of the six is the one where waiting for help is the wrong answer?
The tiles run from least to most serious, and one rule runs through all six: tell a Technical Officer, staff member or supervisor.
The line on spills is worth learning: rubbing alcohol with nothing broken is yours to wipe up; hazardous, unknown, or broken glass is a lab staff job, and that means a spill kit, never paper towel. On cuts and burns the first action is yours, cool the burn under running water, press gauze on the cut, and every lab staff member is a trained first aider. Scan the QR code on the first aid box so it gets restocked.
The splash tile is the one you act on alone. Go straight to the eye wash or shower, do not wait for help, and rinse for the full 15 to 20 minutes, which is far longer than it feels. Find the eye wash and the shower in your own lab this week: when you need them your eyes will be shut.
A centralised alarm usually comes with a PA announcement telling you what it is. It can be any campus-wide emergency, though fire is the usual one.
Make your work safe, then go: equipment and gas off if it is safe to do so, hazardous chemicals back where they belong, nearest staircase, never the lift. The assembly area is the campus field; follow the emergency assembly point signs and find your building number.
Check in with the building warden, orange vest, and the floor wardens in yellow vests, and stay until you are cleared. Do not try to drive off campus: the main gate closes during an emergency so that everyone can be accounted for. Your experiment does not earn an exemption.
Walk your route this week, while nothing is happening.
Two routes, both ending at the campus field. Red is the default. Orange is the alternative, and you take it only if red is blocked or a warden sends you that way.
The reason red comes first is worth knowing: the orange route runs through the cafeteria, so you meet the crowd coming out of it and everyone moves slower.
Trace the red route from your own lab before an alarm makes you learn it.
This is what you are walking towards: the green emergency assembly point sign, then the field itself. Find your building number on the signs and check in with the warden so the headcount works.
Wait on the field, not on the path, and do not go back inside for anything, not a bag, not a laptop, not an experiment. Headcounts fail when people wander off, and a failed headcount sends someone back into the building to look for you.
A localised alarm sounds: gas release in your room. On the way out you flick the light off, grab your phone to call your supervisor, and pull the door shut behind you. Two of those three are dangerous. Which two, and why?
A localised alarm means a gas release in that room, not a building evacuation. Assume the atmosphere is flammable and treat every switch, tool, light and phone as an ignition source. That is the part people get wrong, because reaching for a light switch is automatic.
Closing the door behind you is the one that is right: it contains the gas. Check for anyone working outside a fume hood on your way, alert colleagues as you go, brief technical staff once you are outside, and do not go back in until emergency personnel say the room is safe.
Find every one of these in your own lab this week, along with your safety cabinets, fume hood and biosafety cabinet. Knowing where the eye wash is does not help if you have to think about it.
The last line is the one that gets broken most: never block access to any of it, not with a trolley, a box, a chair, or a stack of consumables that will only be there for an afternoon. A box in front of the safety shower is a genuine hazard, and someone has to move it before they can rinse.
This is homework, and it is not optional. Start with the left column. Those are the ones you may have to use on yourself, in the first seconds, with nobody else around: eye wash, safety shower, break-glass alarm, first aid kit, fire extinguisher.
Then the right column, before you touch the equipment for the first time. The biosafety cabinet video is the CDC series, which is as close to a global standard as this gets.
One practical note: there is no special emergency phone. The lab phone is an ordinary handset. You just dial 333.
Two steps: tell the Technical Officer or your supervisor straight away, then lodge it with OHSE through the Hazard & Incident Reporting form on S.A.R.A.H.+, the Safety and Risk Analysis Hub.
The part that matters is near misses. A near miss is an injury that has not happened yet, and the report that prevents an injury is always the one filed before anything happened.
Look at the pictograms. None of them are exotic: a trip, a spill, a fall from a chair, a cut. Every one of them started as something somebody noticed and did not mention.
The longest part of the module, because most of what we handle lives here. Nearly all of it reduces to three habits: label it, segregate it, and do not let it accumulate.
Risk assessment has a bad reputation as paperwork. It is really one question: what in this procedure can hurt me, and what have we done about it?
Four steps, and the fourth returns you to the first. Identify what can hurt you, assess how likely and how bad, control it with the highest practical measure, then evaluate whether the control actually worked. The cycle never closes, which is why an assessment expires and why a change in the work restarts it.
You do your own on S.A.R.A.H.+, the same hub as the incident form, and your supervisor or a Technical Officer will help if you are stuck. If you are a coursework student, the tutor's briefing before each experiment is your risk assessment: listen to it as one.
A new chemical, a larger scale, a different method, a near miss, or three years passing all start the cycle again.
Five ways to control a hazard: PPE, substitution, engineering controls, elimination, administrative controls. Put them in order, most effective first. Where did you place PPE, and would you have placed it there before this module?
Read the revealed list top down. PPE is the bottom of the list, not the top, because it protects one person, only while it is worn, and only if it is worn properly. Everything above it removes or contains the hazard itself, so it protects everyone in the room whether they are paying attention or not.
The rule is to take the highest control that is practical, not the easiest one. The useful question to ask of your own work is the substitution one: can this procedure be done with a less hazardous solvent?
There is a lion in the room. Name five different ways to make that room safe, then decide which one you would stake your own safety on. Now say which one is the equivalent of a lab coat and safety glasses.
The same five controls as the previous slide, applied to one hazard everybody can picture. Remove the lion; swap it for a cat; put it in a cage; put up a sign telling people not to go in; or hand out body armour and hope.
Only the last one leaves the lion loose in the room, and that is PPE. It is the reason PPE sits at the bottom of the hierarchy: it does nothing to the hazard, it only stands between the hazard and one person.
The Safety Data Sheet is the first step, not the last resort. There are no SDS folders in the lab any more: it is Chemwatch, or the QR code on the wall that opens the sheet set for that lab's principal investigator. Find that code in your own lab.
The single habit that removes most of the risk on this slide is taking only what your bench work needs. Prepare reagents in small quantities, use the hood for anything volatile, and pick your PPE for the material rather than for the room.
Before you shelve anything, check the mixed-storage restriction poster on the cabinet, and know the spill control measures for what you store.
You decant 250 mL of methanol into a bottle you intend to finish tomorrow. Write the label in your head, then count: how many of the required fields could you name without looking? And what happens to that bottle if nobody can say what is in it?
An unlabelled beaker is the most common finding in a lab audit, and the rule covers anything moved out of its original container, including the beaker you will finish with in ten minutes.
Container size decides which label you take. 125 mL or less takes the short one: product identifier with concentration and CAS number, signal word, supplier identification, pictograms, and read the SDS before use. Anything larger adds three hazard statements and three precautionary statements, in English and Malay, taken straight off the SDS.
Copy the supplier name, address and phone from the original bottle or SDS section 1, because that is who gets called in an emergency. And the answer to the last question: if nobody can say what is in it, it becomes hazardous unknown waste, which is slow and expensive to dispose of, and the cost lands on your lab.
Chemwatch is Monash's chemical management system: the SDS library and your own inventory register. It is mandatory, because it is how the university knows what is actually in the building, and a current inventory is one of the three Lab Safety Passport requirements.
Take the training that matches your role. Undergraduates do the Moodle module. Staff, supervisors and principal investigators take Chemwatch Monash Administrator Training on myDevelopment. HDR students take the Chemwatch SDS and Chemical Register Application Training. Keep the completion record: you attach it to the passport form.
Scheduled waste is any waste from lab activity that could harm public health or the environment. That is broader than people expect: contaminated gloves and used syringes count.
Never pour chemicals into a sink or the sewer, never use a dented, damaged or cracked container, and only reuse an empty container for the same waste it held. A solvent bottle can take solvent waste; it can never become a wash bottle, a drinking bottle, or something you take home.
The bag colours catch almost everyone. Biohazard bags are for biological waste only. Anything needing autoclaving goes in blue autoclave bags, yellow bags take clinical waste that is not autoclaved, and all chemical waste goes into ordinary bags with no biohazard logo. Sharps never go in a bag at all.
These are the Department of Environment scheduled waste codes, and they are law, not local convention. The code goes on your label and on the collection paperwork, so read the SDS before you assign one.
Most of what this school generates is SW 410, contaminated rags, papers, gloves and filters, and SW 430, obsolete laboratory chemicals. SW 404 covers everything clinical and pathogenic. SW 430 then splits further by hazard before collection: flammable or toxic, corrosive, mercury and oxidising each go separately.
The full schedule runs to well over a hundred codes. If your waste does not fit one of these five it still has a code, so ask before you label.
Three fields are the ones people leave blank, and they are the three that decide whether the container gets collected: what is actually in it, who generated it and from which school, and the waste stream circled.
The pictogram and category have to match the OHSE segregation sheet posted with the labels, and the code comes from the previous slide. A half-labelled container does not get collected, so it sits in your lab, taking up space and counting against the 180-day clock.
This is the reference slide you will come back to. The order is the same every time: take the right label from the code table, stick it on the day you first put waste in the container, bring it to the collection area within four months, scan the QR and fill in the form, then put it in the right bin or cabinet. Sharps are the only exception: straight into a sharps container.
Four months in the lab is the practical ceiling because the 180-day legal limit runs from that first date and has to cover central storage before the vendor collects.
Two clarifications. The yellow bin means the one in cold room 4-6-15 or at 3-6-17A, not a freezer. And 4-6-10 is not a whole store: it is one vented cabinet for liquid and solid chemical waste. Chemical lab trash belongs on the caged trolley next door in 4-6-09.
Room 3-6-17A holds the yellow SW 404 bin, just inside the door, with the biological and clinical waste flowchart and the scheduled waste QR poster on the wall above it. The same set is at 4-6-15.
Take a minute over the flowchart. It answers the question people actually have, which is not "is this biological?" but "which bag, treated how, into which bin?" Work down it once now and you will recognise it on the wall when you need it.
SW 404 stickers are kept beside the bin. The QR poster is the scheduled waste inventory form: every container gets an entry, or it is not collected.
4-6-15 is the cold room. The flowchart and the scheduled waste QR poster are on the outside of the door, so read them before you go in rather than standing inside with your hands full.
Inside there are two yellow SW 404 bins, and the right-hand one is normally for liquid clinical waste. Every bottle still needs its label and its form entry.
The notice on the door is not decoration: no food or drinks in this refrigerator or freezer, ever.
4-6-10 is Chemical Store 2, card access, with hazardous chemical warning signage on the door and the scheduled waste QR poster on the wall outside.
Inside, the ventilated cabinet marked Scheduled Waste Temporary Storage Area takes liquid chemical waste first, since that is what needs the ventilation. The notice on the door says the rest plainly: chemical lab trash belongs on the caged trolley next door, not in here.
Blank category labels hang in the pocket organiser on the yellow cabinet, sorted by hazard class. Take the one that matches your stream and fill it in before the bottle goes in, not afterwards.
Every bottle also needs a form entry. Unlisted waste is not collected, and a non-compliance report goes to your supervisor.
4-6-09 is Chemical Store 1, next door to 4-6-10, same card access, same hazardous chemical warning. This is where chemical lab trash waits for collection.
Gloves, tips, paper and contaminated packaging go in a normal black bag with no biohazard logo, tied, on the caged trolley. Empty chemical bottles are lab trash too, but they do not go in the bag, where they break: rinse them, cap off, and stand them on the stainless steel trolley beside the cage.
No sharps, no free liquid, no biohazard bags in this room. And log it on the scheduled waste inventory form like everything else.
Work down the first column and answer two things for each: what container, and what must never go in with it. Start with the one people get wrong most, waste acid, when the only empty container on the bench is a metal can.
Six streams cover almost everything you will generate, and the principle is one group per container, in a container that survives its contents. Acids and bases never go in a metal can, they corrode it from the inside. Solids never go in a liquid bottle. Reusing an empty solvent bottle for solvent waste is fine; reusing it for anything else is not.
The rule people break most is the time one on the blue bar. A waste container is not storage. Label it before the first drop, stand it in a tray, fill it to four-fifths, keep the cap on except while adding, and date it when it is full. No more than four months in the lab, because the 180-day legal limit includes the time it spends in central storage.
Which of these would you put in a glass bottle: hydrofluoric acid, nitric acid, or an old ether bottle with crystals around the cap? One of the three should not be moved by you at all.
These are the ones that hurt people. HF dissolves glass, so it goes in polypropylene, and its burns are delayed, meaning you can be badly injured before it hurts. Nitric acid and oxidisers go in glass, on their own, because they ignite organics.
The ether bottle is the one you leave alone. Peroxide formers, water-reactives and unknowns do not go into a waste stream at all, they go to lab management. Crystals around the cap can react to the bottle simply being moved.
If what you are holding is not on this slide or the previous one, ask before you pour.
This is the sentence to take away from the whole module. Safety is not compliance with a list; it is the habit of noticing.
Nearly every serious incident in a teaching or research lab started as something small and unremarkable that nobody mentioned. Report the near miss, and the injury simply never happens.
Who is most likely to have an accident: the person on their first day, the person three months in, or the person in their second year? Answer honestly, then find yourself on the curve.
Almost everyone says day one, and almost everyone is wrong. Nobody is careless on their first day. You read every step, you ask before every move, and your risk is low precisely because you know you do not know.
The dangerous window is month three. The procedure feels routine, the SDS goes unread, the sash creeps up, and confidence has run ahead of competence. By year two you have seen a near miss and you check without being told.
Name it now so you recognise it in yourself later. Confidence is not a control measure.
Four points, and none of them are new. They are the version of this module you should still be able to recall next week.
Safety is shared. It is not the lab staff's job to keep you safe; everyone in the room holds part of it. Small mistakes scale: the unlabelled beaker, the sash left open, the glove kept on, none of which feel like much on their own. Prevention is a habit, not a rulebook, and it is mostly reading, asking and setting up properly before you start. Report immediately, then lodge it.
If you keep one line: safety runs on prevention, not reaction, including in the procedure you have done a hundred times.
Three things to do this week, not eventually. Scan or tap each code: the Laboratory Safety Declaration Form, your risk assessment on S.A.R.A.H.+, and the lodgement form for the finished PDF.
Then request your Lab Safety Passport on the OHSE Asana form, at least 30 days before you need lab access. It is the step with the longest lead time and the one that most often delays a start date.
If your work involves tissue culture, expect a separate briefing with Dr Ronald; he will contact you.
The appendix follows: fume hoods, autoclaves, biosafety cabinets and the reference links. Read the relevant page before your first use of that equipment.
The appendix is reference material, and it is not optional reading. Come back to the relevant page before the first time you use each piece of equipment, and keep it for later.
Every operation involving hazardous chemicals happens inside the hood, not beside it. Keep storage in there to a minimum: chemicals and apparatus both disturb the airflow that is protecting you.
Close the sash whenever the hood is not in use, and use it as a shield when you are boiling liquids or working with reactive chemicals, with your goggles still on.
The foot traffic point is real rather than theoretical: someone walking quickly past the hood face can pull vapour out of it. And no ignition sources inside when flammable liquids or gases are present.
An autoclave uses high-pressure, high-temperature steam to kill microorganisms and inactivate biohazardous material. If you have never operated ours, do not start alone. Contact laboratory management first.
The risks are burns and scalds, hand and arm injuries from the door, and exposure from badly packaged waste. Heat-insulating gloves, a lab coat and closed-toe shoes prevent most of them. Bags are not stocked centrally, so ask your supervisor.
The never-autoclave list is not negotiable. Broken glass and sharps puncture the bag. Chemicals drive off toxic vapour under heat. Dried bleach releases chlorine gas, and nitrocellulose can detonate.
Autoclave your own waste in 3-4-14; staff only run teaching waste. Afterwards, fill in an SW 404 sticker from either yellow bin area and store the bag in the bin.
Contamination control and personal protection are the same discipline here: the cabinet protects you and your work at once, and only while its airflow is intact.
Disinfect the work surface before and after every session, disinfect or sterilise everything you bring in, and disinfect your gloves after touching any non-sterile surface outside the cabinet. Never block the air intake grilles at the front or back, and do not store materials inside.
After a spill, tell your Technical Officer and follow the spill management procedure, then rinse with sterile water: disinfectant left sitting on stainless steel corrodes it.
Reference only, and everything taught from it was covered on the PPE slide. Full-size copies are posted in the lab; this is here so the module carries it with you.
High-hazard PPE is on the left, the everyday minimum on the right. If you are not sure which column your work sits in, ask a Technical Officer rather than guessing downwards. And note the last line: contaminated PPE may itself be hazardous waste, and it never goes home.
Everything behind this module lives on the Monash Malaysia OHSE site. Start with the second link, which splits by role: whether you are a student, a staff member or a supervisor, your own responsibilities are listed there.
The fourth link is the HSW Management System, which carries every university-wide standard quoted here in full: risk management, emergency management, using chemicals, Chemwatch and first aid. Go there when you need the source wording rather than the summary.
Ask the lab staff anything, at any time. Nobody in this school would rather you guessed.
This module and its links stay available to you, so come back to the waste tables, the contact list and the appendix whenever you need them.
One step left. The quiz is the only record that you completed this induction, so nothing counts until you have passed it. You can repeat it as many times as you need.
If anything in this module was unclear, come back to that slide before you start, or ask a Technical Officer. Getting it right matters more than getting it done quickly.
Work out your answer first. The explanation appears here once you have revealed the slide.